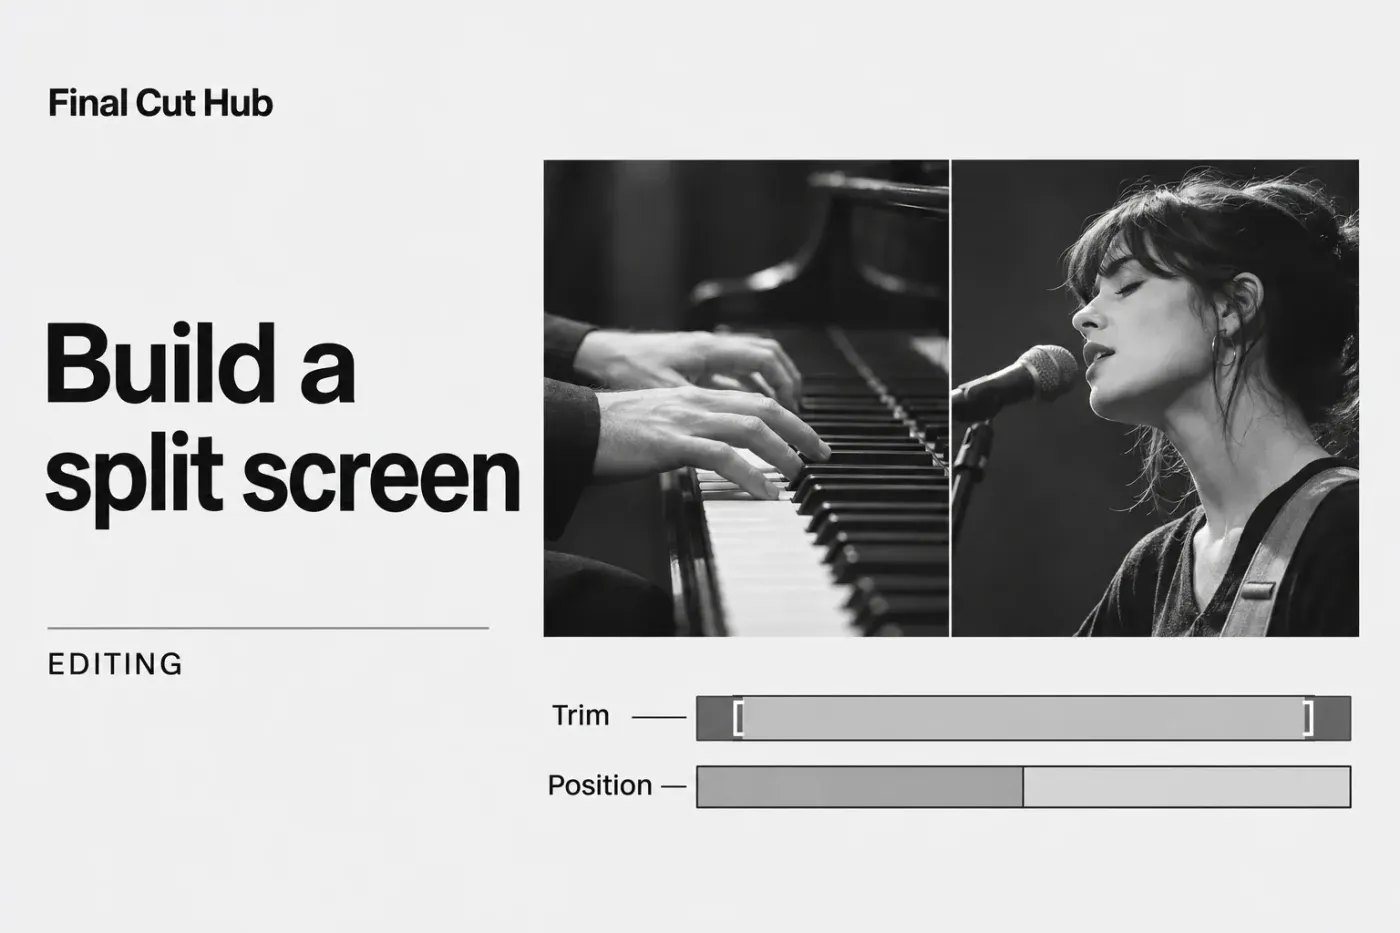
To make a split screen in Final Cut Pro, stack the shots: put one clip in the primary storyline and connect the others above it with Q. Then trim each clip to the size of its panel with the Trim tool (press Shift-C, then click Trim at the bottom of the viewer) and slide it into place with the Position fields in the Video inspector. Picture in picture is the same stack, except the top clip is scaled down instead of trimmed. I'd type the values rather than drag the handles, because typed numbers make the panels meet exactly and the next clip can copy them.
Below: two settings to check first, side-by-side steps with exact values, a table for grids and thirds, Trim versus Crop, mismatched and vertical footage, picture in picture inside the safe zone, borders and dividers, animation, presets, published playback results, the iPad route, plug-ins, and fixes for gaps and black bars. If you want to cut one clip into two pieces on the timeline rather than show two shots at once, that's the job of trimming and splitting clips.
Two settings to check first
Choose Final Cut Pro > Settings (Command-Comma), click General, and set Inspector Units to Pixels. Apple's page on General settings says this choice controls how values appear in the Transform, Crop, and Distort controls. With Percentages selected, the same fields show percentages and none of the pixel values in this guide will line up.
Next, check the project's frame size. When you add the first video clip to a project, Final Cut Pro sets the format, frame size, and frame rate for the whole project from that clip, as Apple explains on its page about conforming frame sizes and rates. The values below assume a 1920×1080 project with clips of the same size. In a 3840×2160 project, double every Trim and Position number and leave Scale as it is.
Position works from the center of the frame. In a 1920×1080 project the center is X 0, Y 0, the left and right edges sit at X -960 and X 960, and the top and bottom edges sit at Y 540 and Y -540. Positive X moves a clip right and positive Y moves it up.
One more rule explains every layout here: a clip connected above another one completely covers it until you trim, scale, or fade it. Apple makes the same point on its page about changing a clip's opacity, and it's why the lower clip seems to vanish the moment you connect a second shot.
Make a side-by-side split screen
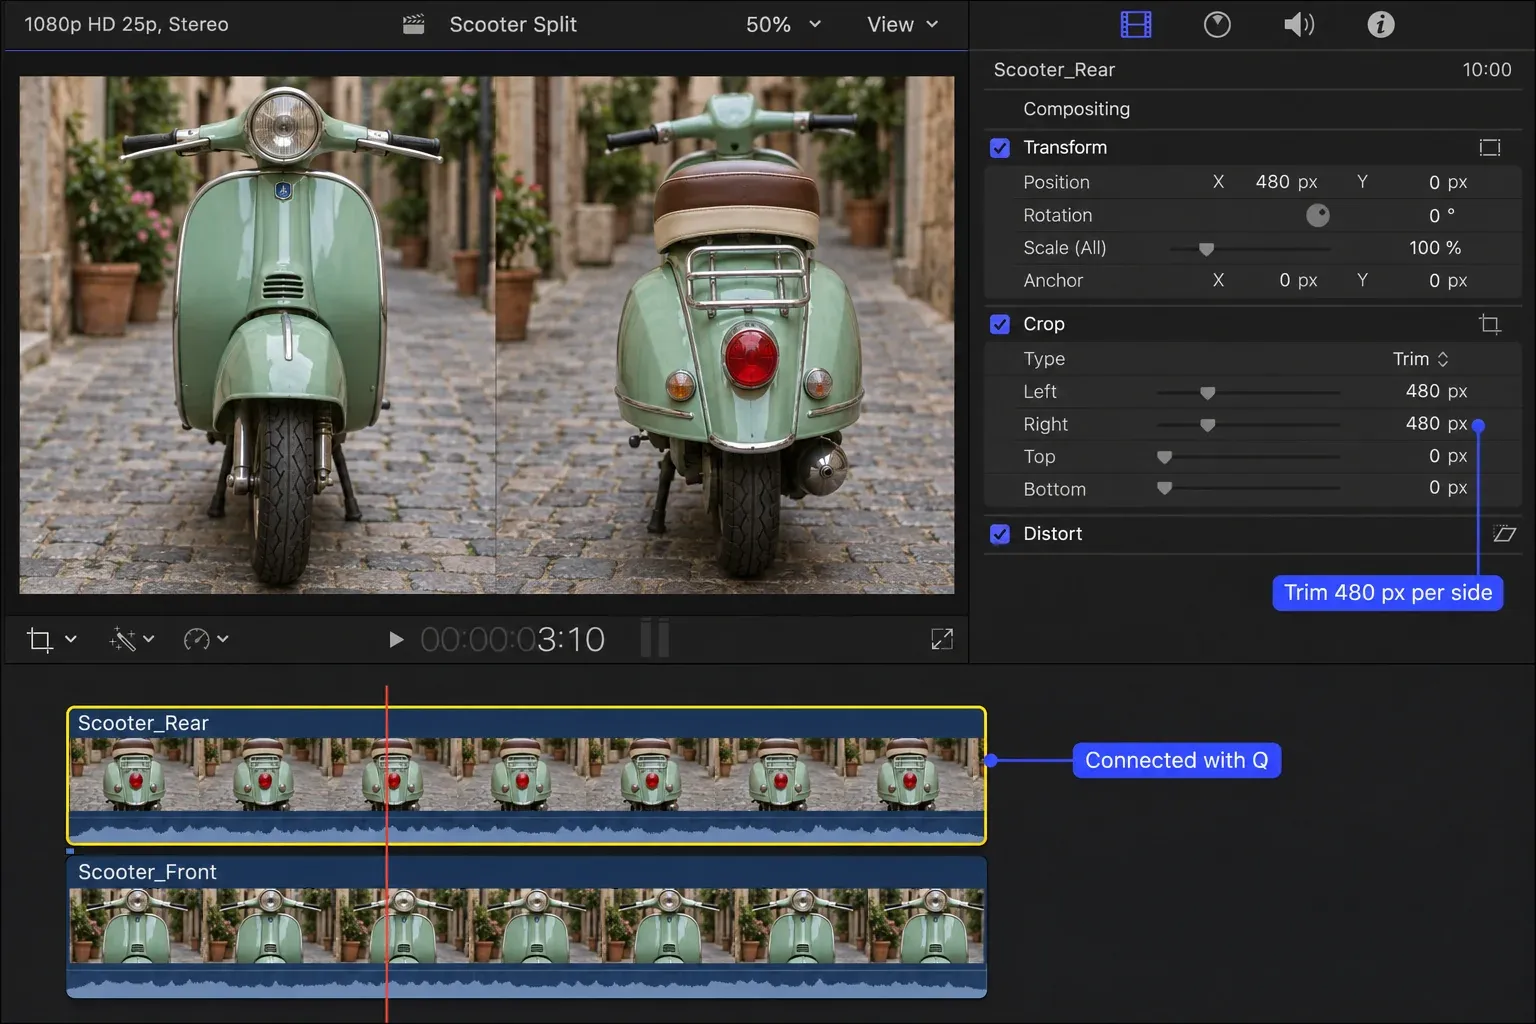
- Put the left shot in the primary storyline. Place the playhead where the split should start, select the right shot in the browser, and press Q (Edit > Connect to Primary Storyline) to connect it above.
- Drag the ends of the connected clip until both clips start and end together.
- Select the top clip and press V to disable it, so the lower clip shows in the viewer.
- Select the lower clip, choose Crop from the pop-up menu in the lower-left corner of the viewer (or press Shift-C), and click Trim at the bottom of the viewer. In the Crop section of the Video inspector (Command-4), set Left to 480 and Right to 480.
- In the Transform section of the same inspector, set Position X to -480. The shot now fills the left half of the frame.
- Select the top clip, press V to turn it back on, set Left and Right to 480 in its Crop section, and set its Position X to 480.
- Click Done in the viewer and play the section back.
Trimming 480 pixels from each side keeps the middle 960 pixels of each shot, exactly half of a 1920-pixel frame. Position then slides each half into place, so the two panels meet at X 0 with no gap and no overlap. Apple's page on trimming the edges of the video frame shows the same controls as on-screen handles: a blue corner handle moves two sides at once and a side handle moves one.
If the subject sits off center, move the trim instead of the shot. Keep Left plus Right at 960 and change the balance between them. For the left panel, set Position X to minus the Left value; for the right panel, set it to 960 minus the Left value. A left-panel shot trimmed to Left 300 and Right 660 goes to X -300, and a right-panel shot trimmed to Left 700 and Right 260 goes to X 260.
I'd sync the two camera angles before building the panels whenever both shots record the same moment, because lips that drift off the sound are far more obvious when the faces sit side by side. The guide to syncing multicam clips covers matching shots by their audio waveforms.
Choose the sound separately from the panel layout. For two angles of the same event, keep the intended recording and silence redundant camera audio. For separate speakers, keep the voices the scene needs and listen to them together. To silence only a clip’s audio, select it, open the Audio inspector (Command-4), and deselect its audio component checkboxes in Audio Configuration. Leave the video enabled: V disables the whole clip. Play through the panel changes and confirm the intended voices remain audible.
Values for common layouts
| Layout | Each clip | Position |
|---|---|---|
| Side by side, full height | Trim Left 480, Right 480 | X -480 and X 480 |
| Top and bottom | Trim Top 270, Bottom 270 | Y 270 and Y -270 |
| Three columns | Trim Left 640, Right 640 | X -640, X 0, and X 640 |
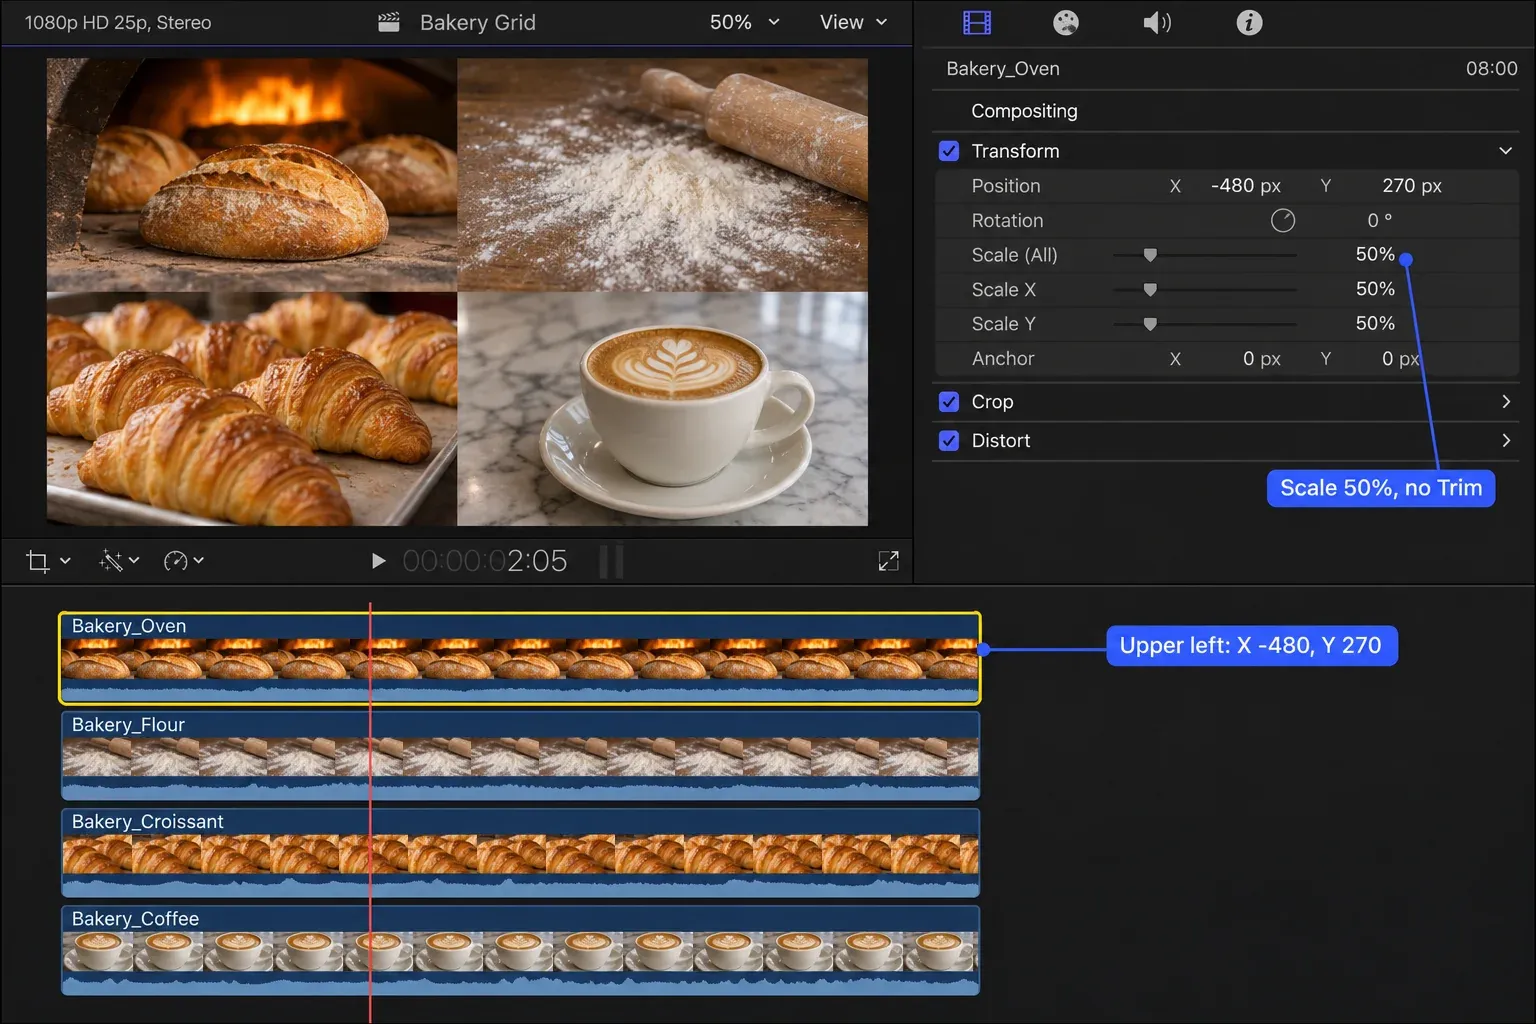
| 2×2 grid | Scale 50% | X -480 Y 270, X 480 Y 270, X -480 Y -270, X 480 Y -270 |
| Side by side, whole frame visible | Scale 50% | X -480 and X 480, Y 0, with black above and below |
| Side by side with a 10-pixel divider | Left clip: Left 480, Right 485; right clip: Left 485, Right 480 | X -480 and X 480, over a solid generator |
| Side by side, off-center subject | Left plus Right equals 960 | Left panel: X = minus Left; right panel: X = 960 minus Left |
Stupid Raisins uses the same arithmetic in its 2×2 split-screen tutorial: 1920 divided by 4 is 480 and 1080 divided by 4 is 270, so the upper-left clip sits at X -480, Y 270, and anything below or to the left of center takes a negative value. A three-column layout needs one clip in the storyline and two connected above it, and a grid needs three connected clips.
To name each speaker or angle, add a title over each panel. The guide to text and titles covers adding one with Control-T and setting its position and timing.
Trim, Crop, or Ken Burns: which mode to use
The pop-up menu in the viewer opens one set of controls with three modes, and only one of them builds panels.
| Mode | What it does | Use it for |
|---|---|---|
| Trim | Cuts the edges away and leaves the rest of the frame empty, so whatever sits underneath shows through | Split-screen panels and insets, together with Transform |
| Crop | Cuts the edges away, then enlarges the result to fill the frame at the original aspect ratio | Reframing a single full-screen shot |
| Ken Burns | Moves between a start framing and an end framing over the length of the clip | Slow pans and pushes across a still or a wide shot |
Apple describes the Trim result as a window look that's often combined with Transform, which is a split screen in one sentence. Crop can't make a panel: Apple's page on cropping clips says the cropped image automatically expands to fill the screen and always keeps the original aspect ratio, so the shot never gets narrower.
Scaling up has a limit. Mark Spencer's split-screen walkthrough on ProVideo Coalition puts it at perhaps 5 to 10 percent for native clips before they soften, and notes that these controls really shine with 4K clips in a 1080 timeline. If a panel needs a tighter framing than that, the guide to zooming in on a clip covers punch-ins and how far each format can go.
When the clips don't match the project
A clip with a different frame size from the project gets a Spatial Conform section in the Video inspector; Apple's conform page notes that the section doesn't appear when a clip already matches. It has three settings:
- Fit, the default, scales the clip to fit inside the frame without cropping and adds black bars where the shapes differ.
- Fill scales the clip to fill the frame and crops along the longer dimension.
- None shows the clip at its native size.
A 4K clip in an HD project is the best case for a split screen. With Fit, Scale 100% shows the whole 4K frame shrunk to 1920×1080, and anything up to 200% still draws on the clip's own pixels. One wide 4K shot of two people can feed two close panels without either going soft.
With clips of different sizes, including 4K clips in an HD project, the Trim numbers in the table don't carry over one to one. Drag the Trim handles by eye until each shot fills its share of the frame, then nudge Position until the panel edges just touch. A solid generator underneath, as in the divider method below, hides any hairline that won't close.
Split screen for vertical video
A 1080×1920 vertical project stacks panels top and bottom instead of side by side.
| Clip shape | Each clip | Position |
|---|---|---|
| Vertical 1080×1920 clips | Trim Top 480, Bottom 480 | Y 480 and Y -480 |
| Landscape 1920×1080 clips with Spatial Conform on Fit | Scale 158.1% | Y 480 and Y -480; the frame cuts off the sides |
Fit shrinks a landscape clip to 1080×607.5 in a vertical frame, so Scale 158.1% brings it to about 960 pixels tall, half the frame height. That still uses fewer rows than the clip's native 1080, so the picture stays sharp, but only the middle of each shot's width survives. Frame the subject in the center when you shoot for this layout. Setting up the vertical project itself is covered in the guide to vertical video in Final Cut Pro.
Picture in picture
- Put the main shot in the primary storyline and connect the inset shot above it with Q.
- Select the inset clip and choose Transform from the pop-up menu in the lower-left corner of the viewer (Shift-T), or work in the Transform section of the Video inspector.
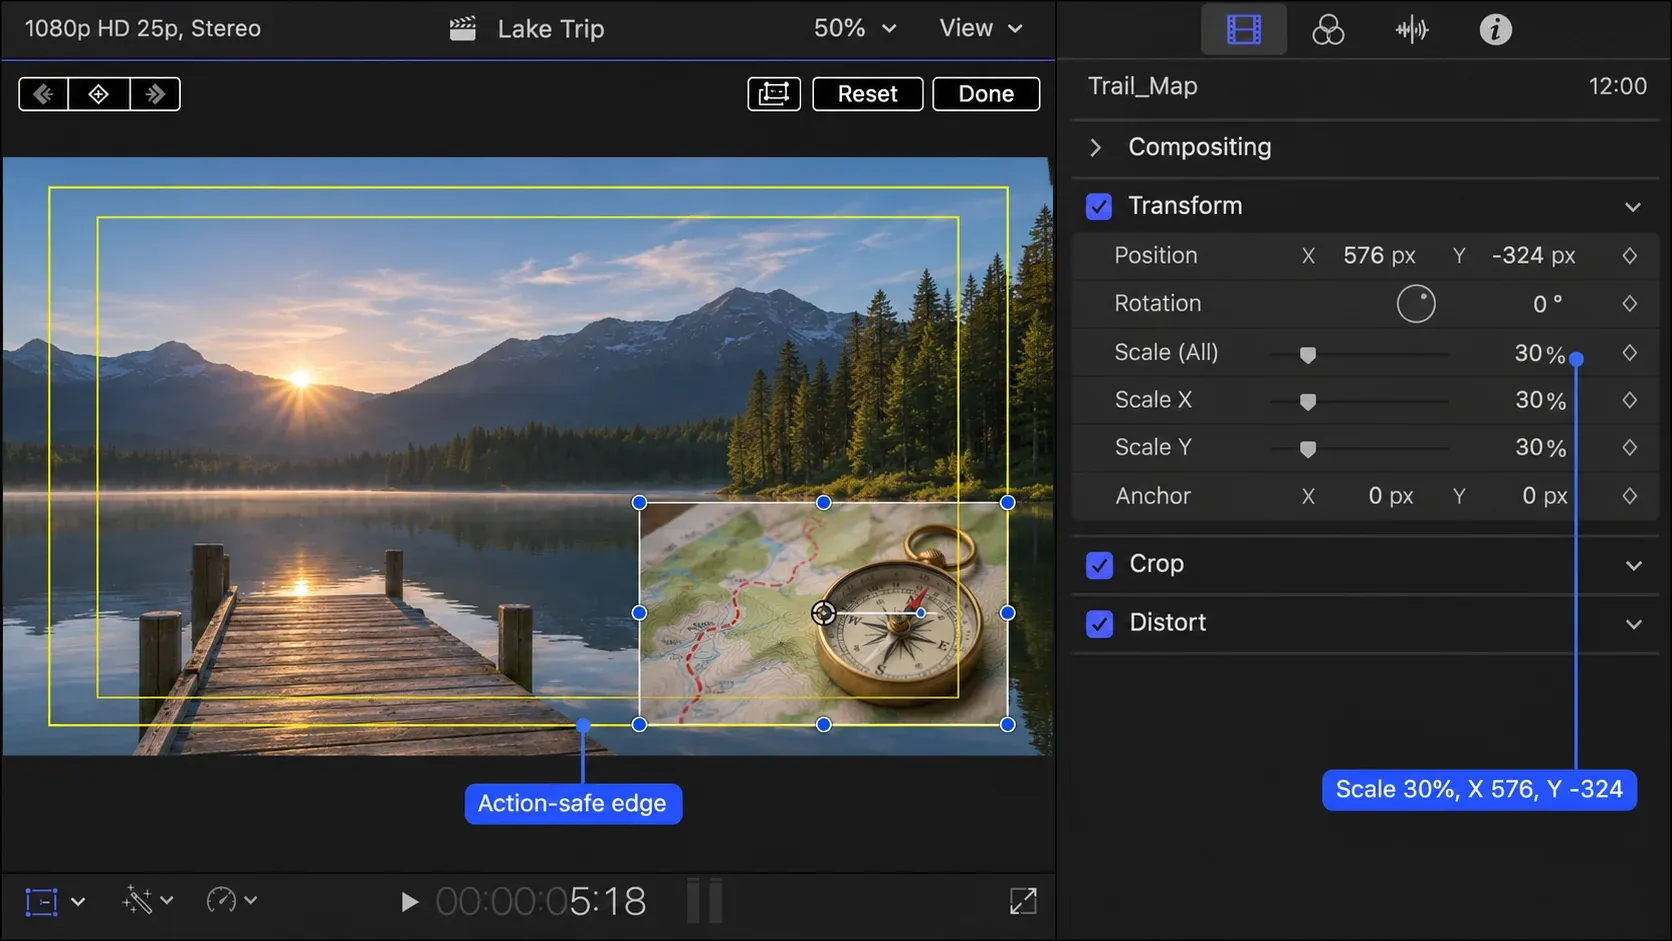
- Set Scale to 30%.
- Set Position X to 576 and Position Y to -324 for the bottom-right corner.
- Click the View pop-up menu at the upper right of the viewer and choose Show Title/Action Zones to check that the inset sits inside the action-safe area.
On Apple's page on resizing, moving, and rotating clips, dragging a corner handle keeps the proportions while a middle handle changes them, so typing one Scale value is the safest way to avoid a stretched face. The values above keep a 30% inset, 576×324 pixels, inside the action-safe zone. Apple's page on viewer overlays defines action safe as the inner 90 percent of the frame and title safe as the inner 80 percent, and neither guide appears in the output.
| Corner | Position X | Position Y |
|---|---|---|
| Bottom right | 576 | -324 |
| Bottom left | -576 | -324 |
| Top right | 576 | 324 |
| Top left | -576 | 324 |
For any other size, write the scale as a decimal s. X = 864 - 960 × s and Y = 486 - 540 × s give the top-right corner; make X negative for the left side and Y negative for the bottom. At 25%, that's X 624 and Y 351.
I'd put the inset in the corner opposite any lower third or captions, because two boxes fighting for the same corner make both harder to read.
For a round or soft-edged inset, open the Effects browser (Command-5), search for "shape", and apply Shape Mask to the inset clip. Apple's page on simple shape masks says the mask starts as a partially feathered ellipse; the curvature handle moves it between a perfect rectangle and an oval or circle, and dragging the outer circle close to the inner one gives a hard edge. Stupid Raisins' picture-in-picture tutorial gets a true circle with Curvature at 100% and the same value in Radius X and Radius Y.
If the inset is a presenter filmed against green, key it first with the steps in the green screen guide, then scale and position the keyed clip the same way.
Borders, dividers, and a drop shadow
A thin line between panels or around an inset makes the layout read at a glance. A divider between panels is the easy one: put a solid generator at the bottom of the stack and leave a gap for it to show through. Place the Custom generator from the Solids category of the Generators browser in the primary storyline, connect both shots above it, and trim each a few pixels short of the center. Right 485 on the left clip and Left 485 on the right clip leave a 10-pixel line in the generator's color, which you set in the Generator inspector. Stupid Raisins builds its grid borders the same way, with a solid color generator underneath the panels.
A border around an inset is trickier. Simple Border looks like the answer, but Stupid Raisins points out that it draws on the inside of the edge, covering part of the shot, and Ripple Training's Steve Martin notes in his tutorial on insets with borders that it doesn't work on cropped images. His workaround builds the border from a generator:
- If the inset is trimmed rather than scaled, first move its anchor point to the center of the visible picture so the border grows evenly on every side, then reposition the inset.
- Option-drag the inset upward to place a copy above itself, select either copy, and press Command-C.
- Drag the Custom generator from the Solids category onto the lower copy and choose Replace from Start.
- Select the generator, press Shift-Command-V, select Position, Scale, Anchor, and Crop in the Paste Attributes window, and click Paste.
- Increase the generator's Scale until its edges show around the inset, and pick the border color in the Generator inspector.
- Select both clips, press Option-G, and name the compound clip.
- Search the Effects browser for "shadow" and drag Drop Shadow onto the compound clip.
Wrapped in a compound clip, the inset, border, and shadow move, fade, and animate as one piece for the rest of the edit. The guide to compound clips explains how to open one, change what's inside, and break it apart later.
Animate the panels
Panels that slide or grow into place need keyframes on Position or Scale: add a keyframe at the first frame, move the playhead, and change the value. Stupid Raisins pops its inset in with two Scale keyframes ten frames apart, starting from 0. The guide to keyframes in Final Cut Pro covers easing and copying keyframes to the next clip.
Transitions are the faster route. Stupid Raisins animates its grid with Center from the Wipes category, Duplicate from Replicator/Clones, and Scale from Movements, each set to 20 frames with Control-D and staggered 5 frames apart so the panels arrive one after another. The guide to transitions shows how to add one and change its duration.
For a plain fade in or out, press Control-V to open the Video Animation editor and drag the fade handles at the ends of the Opacity row.
Save the layout and reuse it
Once a panel looks right, save it. Select the clip, choose File > Save Video Effects Preset or click Save Effects Preset at the bottom of the Video inspector, then name the preset, choose a category, and select the attributes to include. Apple's page on saving video effects presets covers the keyframe choice: Maintain Timing keeps keyframes at their original spacing, while Stretch to Fit spreads them across the new clip. The preset then appears in the Effects browser and applies like any other effect.
I'd save one preset per panel, named for its position, such as Split Left and Split Right, because a two-panel layout then takes two drags from the Effects browser.
For a one-off, copy the finished clip with Command-C, select the next one, choose Edit > Paste Attributes (Shift-Command-V), and select Crop and Transform. Apple's page on copying effects between clips lists the same Maintain Timing and Stretch to Fit choices. To move presets to another Mac, reveal the preset in the Finder, zip it, and install it in ~/Library/Application Support/ProApps/Effects Presets/ on the other machine.
Will your Mac play it smoothly? Published test results
A split screen asks the Mac to decode several shots at the same moment. These multicam results show how codec and media choices affect simultaneous playback. They don't measure a finished split screen with Trim, scaling, borders, and effects.
| Source | Mac and version | Media | Result |
|---|---|---|---|
| Larry Jordan, 2023 | 16-inch MacBook Pro, M1 Pro, 32 GB, Final Cut Pro 10.6.5 | 4K media as ProRes Proxy at 50% size | 50 streams played easily, with the CPU at about one fifth |
| Larry Jordan, 2023 | Same Mac | H.264 proxies at 50% size | 15 streams smooth; dropped frames at 20 |
| Larry Jordan, 2024 | M-series Macs in the review, including M4 Pro Mac mini; Final Cut Pro 11 | UHD ProRes 422 | Stopped counting at 40 streams; a 40-clip run used 2.22 GB of Final Cut Pro RAM |
| Larry Jordan, 2024 | 2018 Intel Mac mini, i7, 8 GB RAM; Final Cut Pro 11 | 4K multicam | Could not play the 4K multicam test |
| Apple, 2021 | MacBook Pro with M1 Max | 4K and 8K ProRes | Apple advertised up to 30 streams of 4K or 7 streams of 8K |
The M1 Pro figures come from Larry Jordan's test of how many multicam streams of 4K media Final Cut Pro can edit, the 2024 M-series and Intel figures from his M4 Pro Mac mini performance review, and the M1 Max claim from Apple's M1 Pro and M1 Max MacBook Pro announcement. The Mac models, Final Cut versions, codecs, and proxy sizes differ, so a pooled stream count would obscure the conditions. Within Jordan's 2023 test, the same M1 Pro played 50 ProRes Proxy streams but dropped frames at 20 H.264 proxy streams, both at 50% resolution.
My verdict: I'd use ProRes proxies when a split screen stutters, because Jordan's same-Mac comparison shows a large decoding advantage over H.264 proxies. Switch the viewer to Proxy Preferred, then play a representative section with every panel and effect enabled. If a section still drops frames, press Control-R for the selection or Control-Shift-R for the whole project. The proxy workflow guide covers creating proxies and switching back to full quality before export.
Split screen on iPad
Final Cut Pro for iPad builds the same layout with touch controls. Apple's page on resizing, repositioning, and rotating clips describes shrinking a clip placed above the primary storyline so it floats over the background:
- Place the second shot above the primary storyline, select it, and tap Inspect in the lower-left corner.
- For a panel, open Crop Tools in the inspector (scroll down if it's out of view), drag the side handles or type values in the Crop tab, and leave Scale to Fill off.
- For an inset, turn on Lock Proportions and drag a corner handle, or type Scale and Position values with the keypad.
- Drag the clip into place, then use Copy All Settings on the finished clip and Paste Transform Settings on the next one.
Apple's page on cropping and reframing clips on iPad says Scale to Fill forces the cropped image to fill the entire frame, which suits reframing and ruins a panel. Reset Transform Settings starts over and also removes any transform keyframes.
Plug-ins for grids and insets
The built-in tools handle every layout above, but plug-ins save time on repeat work:
- Screen Splitter 2 ($20, FCPEffects) has more than 100 size presets such as 33 High 33 Wide, black, white, or no border with adjustable width and color, snap-to positions, and inside scale, position, and rotation controls. The Screen Splitter product page says it's built for 16:9 projects and suggests turning photos and other sizes into compound clips first with Option-G. It runs on Intel Macs and natively on Apple silicon.
- Picture in Picture ($49, PremiumVFX) is sold through FxFactory as a quick way to create PiP effects. The FxFactory Picture in Picture page lists it beside the same developer's Split Frames ($49), described as split-screen layouts inspired by television broadcasts.
Screen Splitter earns its price when grids are a weekly job; for an occasional split, the values table above does the same work for free. The plug-ins guide explains installing effects and what to do when one goes missing.
Gaps, black bars, and other problems
- A hairline gap between panels. Check that each pair of Trim values adds up (Left plus Right equals 960 for halves of an HD frame) and that Inspector Units is set to Pixels.
- The lower clip won't show while you adjust it. The clip above covers it. Press V on the top clip, then press V again when you're done.
- A panel is missing from the export. A disabled clip is invisible, silent, and absent from every output, as Apple's page on soloing or disabling clips notes. Select it and press V, then run the export again with the settings from the export guide.
- Black bars around a panel. The clip doesn't match the project size and Spatial Conform is on Fit. Switch to Fill or scale the clip up.
- A soft panel. The shot is scaled past its own pixels. Stay within the limits in the Trim and Crop section, or use 4K sources in an HD project.
- The border vanishes on a trimmed inset. Simple Border doesn't work on cropped images; build the generator border instead.
What I'd do
For a two-person interview, I'd put a solid generator in the primary storyline, connect both angles above it with Q, trim the left shot to Left 480 and Right 485 and the right shot to Left 485 and Right 480, then set their X positions to -480 and 480 for a 10-pixel divider. I'd save each panel as a preset, because the next interview then takes two drags instead of a dozen typed values. For a reaction inset, I'd scale it to 30%, place it at X 576 and Y -324 inside action safe, and wrap it with a generator border in a compound clip, because the border, shadow, and fades then stay together however the edit changes.