To speed up or slow down a clip in Final Cut Pro, select it in the timeline, click the Retime pop-up menu below the viewer, and choose Slow or Fast, then a preset speed. For an exact value, choose Retime > Custom and type a rate, or press Command-R and drag the handle at the end of the retime bar. To play a clip backwards, choose Reverse Clip from the same menu, and Shift-N puts it back to normal speed. I'd type the rate in Custom when the speed has to match music or another shot, because a typed 50% is exact and a dragged handle rarely is.
Below: the presets and the retime bar, Custom speed and the Ripple checkbox, smooth slow motion from high-frame-rate footage and from Smooth Slo-Mo, how the slow-motion methods compare in published side-by-side tests, pitch, reverse and rewind, jump cuts and instant replays, resetting, rendering, the iPad app, and fixes for speed changes that won't behave.
Speed up or slow down with the Retime menu
Apple's guide to changing clip speed works on a range, a whole clip, or a group of clips:
- Select what should change. Click a clip, or press R for the Range Selection tool and drag across just the part that should play faster or slower. To change only part of a clip, you can also cut it first; the guide to trimming and splitting clips shows the Blade tool.
- Pick a preset. Click the Retime pop-up menu below the viewer (or use Modify > Retime) and choose Slow or Fast, then a speed. Boris FX's step-by-step speed walkthrough lists the presets as 10%, 25%, and 50% for Slow and 2x, 4x, 8x, and 20x for Fast.
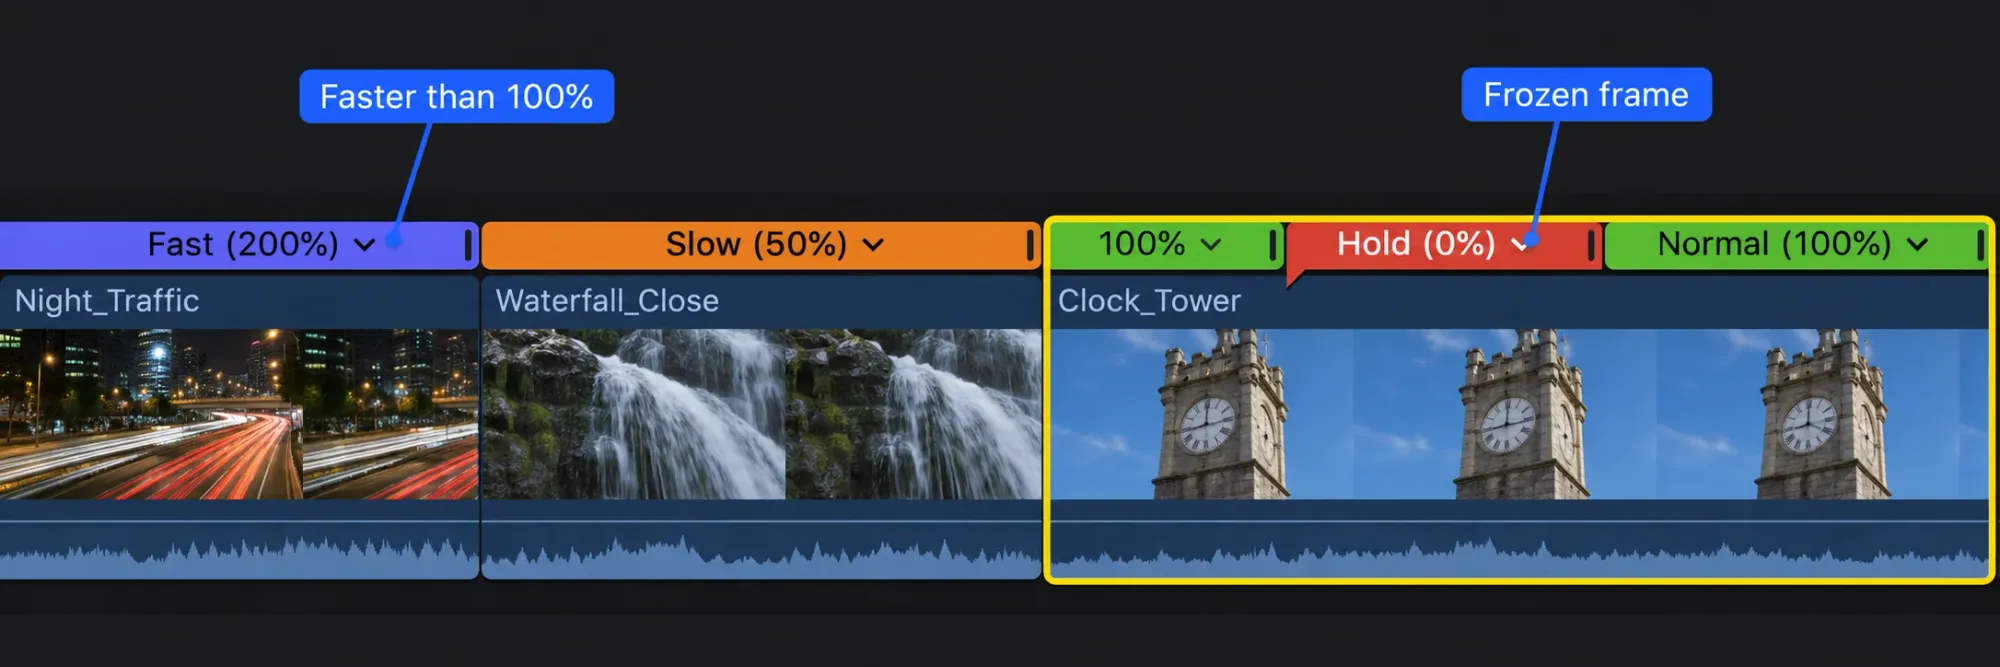
- Play it back. A colored retime bar appears above the clip and shows the new speed as a percentage.
The bar's color tells you what the clip is doing before you play it. Apple describes orange for slower and blue for faster, and Larry Jordan's guide to varying playback speed adds green for exactly 100% and red for a hold, where a single frame stays on screen.
Speed lives on the clip in the project, not in the media file. Apple's note on the same page says the source file on your Mac doesn't change, so a retimed shot used in two projects can run at two different speeds, and you'll get a file with the new speed baked in only when you export the project or clip. Apple's introduction to retiming also lists what can't change speed at all: still images, generators, titles, and themes.
Set an exact speed with Custom or the retime editor
Presets jump in big steps. For anything in between, there are two ways to dial it in.
- Custom Speed window. Choose Retime > Custom. Pick Forward or Reverse, then Rate to type a percentage or Duration to type how long the clip should last. Duration is the quicker route when a shot has to fill an exact gap, such as four seconds of music before a cut.
- Retime editor. Choose Show Retime Editor from the Retime menu or press Command-R. Drag the handle at the right end of the bar to the right to slow the clip down (the bar turns orange) or to the left to speed it up (the bar turns blue). Command-R only shows and hides the editor; it doesn't reset the speed.
Ripple on or off
The Ripple checkbox in the Custom Speed window decides what happens to everything after the clip. With Ripple on, which is the default, the clip's length changes with its speed and later clips move. Apple's example: a 5-second clip at 50% becomes 10 seconds long, and at 200% it plays in 2.5 seconds, pulling the rest of the edit left. That's the magnetic timeline doing its usual job.
With Ripple off, the rest of the project stays in place; the selected clip does not always keep the same length. Slowing a clip with the next clip directly after it keeps the available timeline interval, so less of the original action fits. In Apple’s example, a five-second shot of a football being thrown and caught, slowed to 50%, ends before the catch. If there is a gap to the right, the slowed clip can expand into it. Speeding the clip up shortens it and leaves a gap before the next clip. Check both the clip’s ending action and the next edit point after changing the speed.
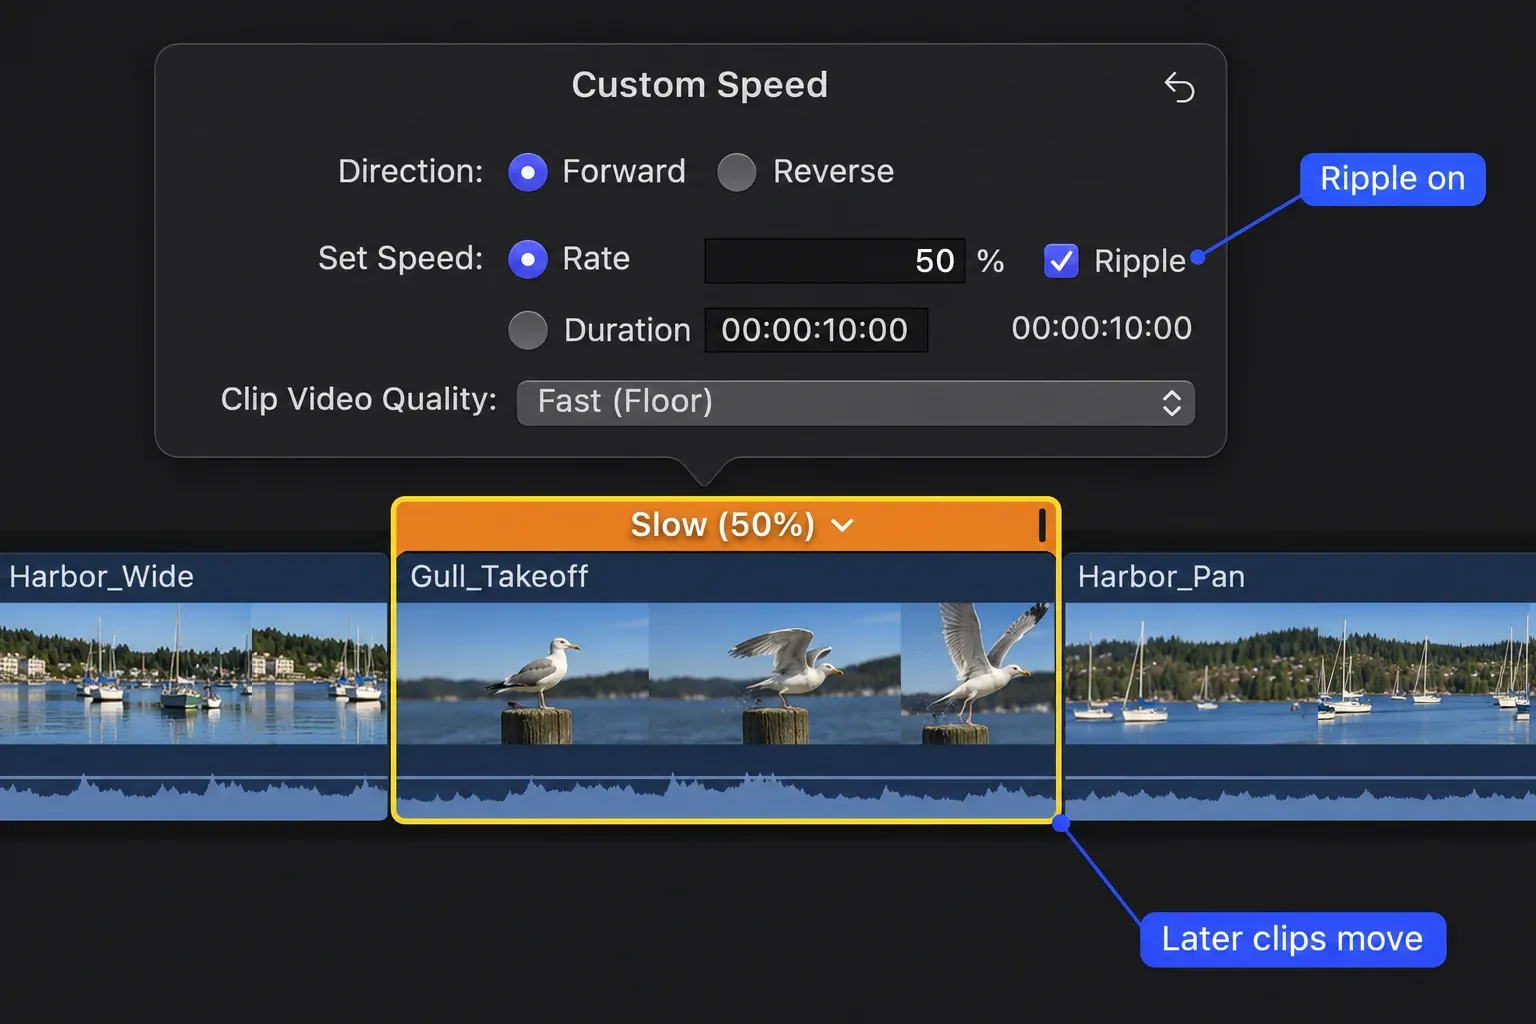
I'd keep Ripple on while the edit is still taking shape and turn it off once the cuts sit on the beat, because a rippled speed change quietly drags every later edit off the music.
Make smooth slow motion
Slow motion looks smooth when every frame on screen is a real frame. There are two ways to get there: shoot at a high frame rate and let Final Cut play every frame, or let Final Cut create the missing frames.
From high-frame-rate footage: Automatic Speed
Apple's page on playing back slow-motion clips notes that iPhone can record up to 240 fps in Slo-mo mode and that clips recorded at 95 fps or above show a special icon in the browser. Select such a clip in the timeline and choose Retime > Automatic Speed. In Apple's example, a 120 fps shot in a 30 fps project plays every original frame at 30 fps, so the action takes longer with no frames skipped or duplicated. The resulting speed is simply the project frame rate divided by the source frame rate:
| Source frame rate | Project frame rate | Resulting speed | 1 second of action lasts |
|---|---|---|---|
| 60 fps | 30 fps | 50% | 2 seconds |
| 120 fps | 30 fps | 25% | 4 seconds |
| 240 fps | 30 fps | 12.5% | 8 seconds |
| 60 fps | 24 fps | 40% | 2.5 seconds |
| 120 fps | 24 fps | 20% | 5 seconds |
Going slower than that number brings back made-up frames, so if 25% isn't slow enough for a 120 fps shot, the Video Quality setting below matters again. Automatic Speed has no default shortcut in Apple's list, but the Command Editor lets you assign one, and the guide to Final Cut Pro keyboard shortcuts covers how.
From normal footage: Video Quality and Smooth Slo-Mo
When there aren't enough real frames, Retime > Video Quality decides how Final Cut fills the gaps. Fast (Floor) is the default and duplicates frames, which is where the stutter comes from. Good (Frame Blending) mixes neighboring frames, Better (Optical Flow) draws new in-between frames from pixel movement, and Best (Machine Learning) builds new frames with a machine-learning model. Every option except Fast (Floor) requires rendering, and Apple's tip is to settle the speed with Good first, then try Better or Best if you see artifacts. The speed ramp guide compares all five options side by side.
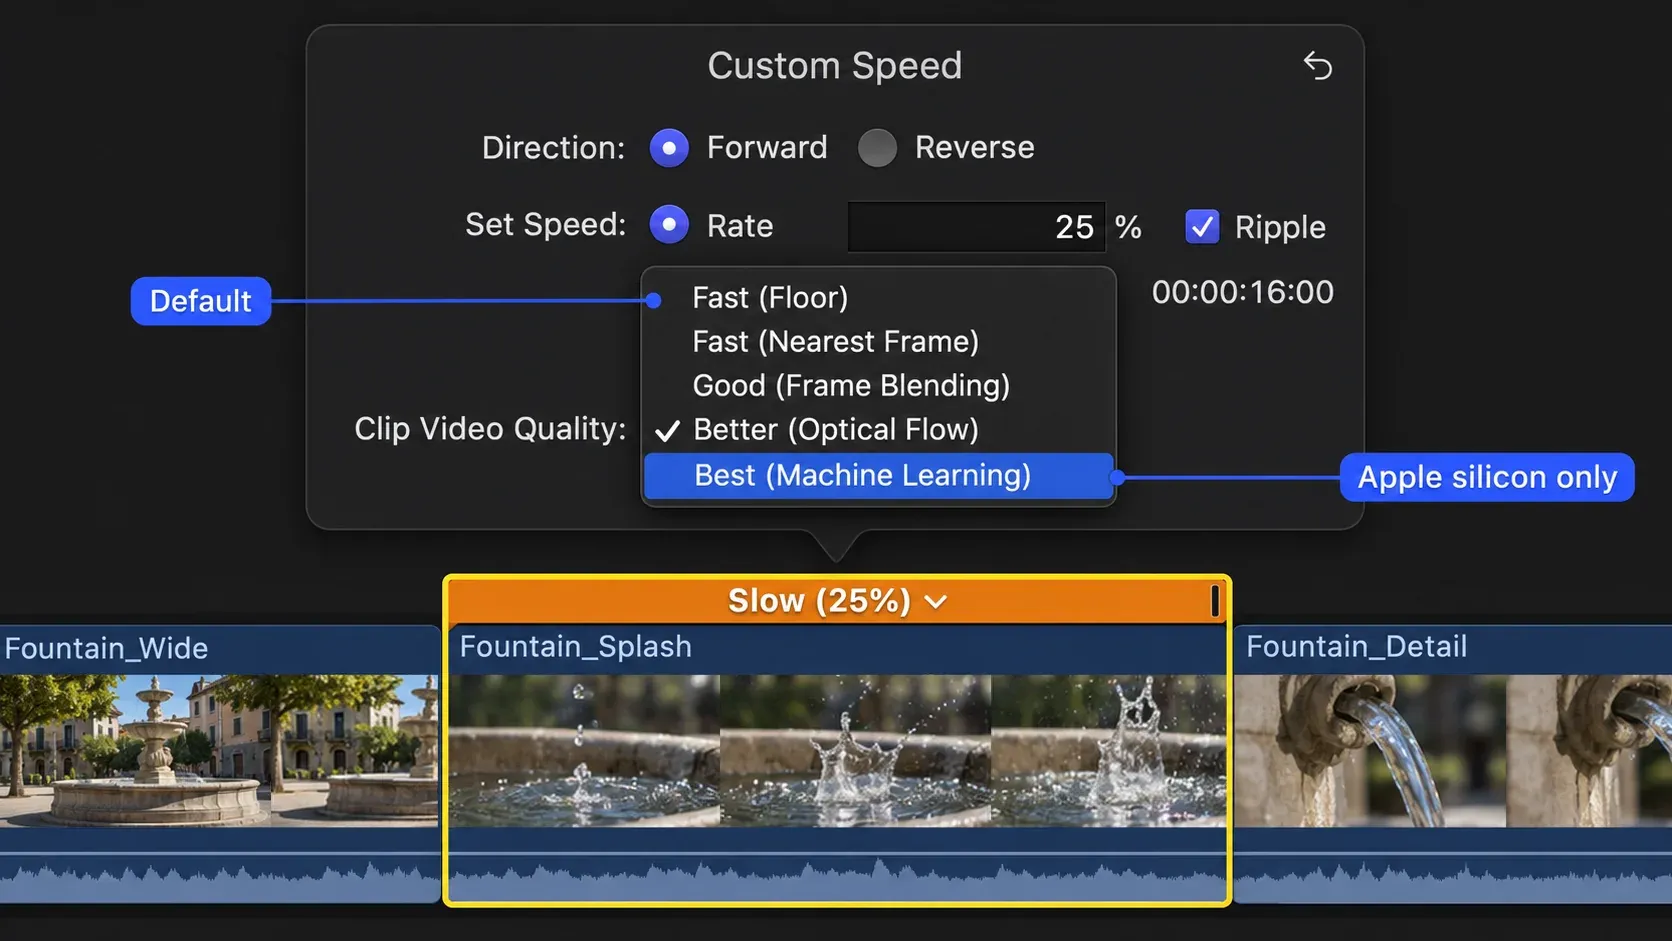
Smooth Slo-Mo is the shortcut to the Best setting. Apple gives three ways to apply it:
- Retime pop-up menu > Smooth Slo-Mo, then a preset speed.
- Modify > Retime > Smooth Slo-Mo, then a preset speed.
- A custom speed, with Clip Video Quality set to Best (Machine Learning) in the Custom Speed window.
It needs a Mac with Apple silicon. Frame sizes above 1920 x 1080 need analysis and rendering time, frame sizes above 4K need an M2 chip or later, and 8K is the largest supported size. If your Mac is close to the limit, the guide to Final Cut Pro system requirements shows which chips run what. Apple also notes that version 10.8 brought an improved machine-learning model, so older projects that used Optical Flow can be reanalyzed by switching them to Best (Machine Learning).
How the slow-motion methods compare in published tests
Two published reports favor Smooth Slo-Mo on the footage shown. In ProVideo Coalition's in-depth look at Final Cut Pro 10.8, Iain Anderson compared Optical Flow with the new machine-learning mode on two shots. Joakim Lloyd Raboff's Smooth Slo-Mo test on an M4 MacBook Pro reports smooth results at 25% speed, without an Optical Flow comparison.
| Shot | Speed | Better (Optical Flow) | Smooth Slo-Mo (Best) | Published by |
|---|---|---|---|---|
| Hand-held iPhone shot of a cyclist | 25% | Broke up around the helmet and front wheel | No obvious mistakes | ProVideo Coalition, June 2024 |
| 25 fps shot from a moving vehicle | 10%, then 2% with Smooth Slo-Mo only | Flaws in the sidewalk and around a passing sign | No visible artifacts at 10% or at 2% | ProVideo Coalition, June 2024 |
| 60 fps iPhone 14 Pro Max footage on an M4 MacBook Pro 16-inch | 25% | Not compared | No stutter, no ghosting | raboff.com, June 2025 |
In Anderson's two comparisons, he found no obvious Smooth Slo-Mo artifacts where Optical Flow showed visible flaws; his moving-vehicle shot also looked clean at 2%. Raboff reported "No stutter. No ghosting." at 25% with 60 fps footage. That matches Apple's own description of Best (Machine Learning) as the method with reduced artifacts and better occlusion handling, where one object passes in front of another. Anderson called the extra processing time "not excessive"; neither source publishes render times. He also points out that the model can't invent detail the camera never caught, such as a brief spark, and that a camera can lose image quality at very high frame rates, so 60 fps plus Smooth Slo-Mo can beat 120 fps for some shots.
My verdict: on an Apple silicon Mac, I'd start with Smooth Slo-Mo for slow motion made from normal-frame-rate footage, because it handled the two Optical Flow problem shots better in Anderson's comparison. Check moving edges and occlusions before rendering the whole clip. I'd still shoot at a high frame rate when the action is fast and short, such as water splashes or sparks, because real frames hold detail that no model can recreate. Rendered slow motion also adds render files to the library, and the guide to deleting render files shows how to clear them once the project is finished.
Keep or change the audio pitch
Preserve Pitch is on by default, so a sped-up voice stays at its normal pitch instead of sounding like a cartoon. To hear the pitch change with the speed, select the clip and choose Retime > Preserve Pitch; the checkmark beside the command shows whether it's on. Even with pitch preserved, fast speech gets hard to follow, so I'd mute dialogue on heavy fast-motion shots and lay music under them, because chopped-up speech draws more attention than the picture.
Reverse or rewind a clip
Apple's page on reversing or rewinding clips covers two different effects:
- Reverse Clip plays the frames backwards, last frame first. Select the clip and choose Retime > Reverse Clip. A green bar with arrows pointing left appears above it. Drag the bar's handle to make the reversed clip faster or slower, or set Reverse with a rate in the Custom Speed window to do both in one step.
- Rewind plays the selection, then a rewound copy at 1x, 2x, or 4x, then the selection again at normal speed. Choose Retime > Rewind and a speed. It suits a "wait, watch that again" moment.
Reversing is also a shooting trick. Frame.io's focus-pulling tip by Reuben Evans plans a difficult focus pull backwards on set, starting on the prop and pulling to the actor, then flips the shot with Reverse Clip in post so it plays the right way round.
Speed changes, reverse included, work inside a single clip. To play a run of several clips backwards or at one speed as a single piece, Larry Jordan's method is to select them, press Option-G to make a compound clip, and retime the compound clip, which changes every clip inside it. I'd use that route for a montage, because one speed setting on the compound clip is quicker to change later than a separate setting on every clip inside it.
Jump cuts, instant replays, and holds
The Retime menu has three more tools that change timing without a plain speed change:
- Jump Cut at Markers. Add a marker wherever a jump should happen, then choose Retime > Jump Cut at Markers and the number of frames to skip: 3, 5, 10, 20, or 30. Apple's jump-cut page uses a 10-second walk down a hallway, cut every 2 seconds by 30 frames, so the walk happens faster without fast motion.
- Instant Replay. Select a range and choose Retime > Instant Replay and a speed. Apple's instant replay page says Final Cut appends a copy of the selection and adds an "Instant Replay" title in the upper-right corner, which you adjust like any other title.
- Hold. Shift-H adds a 2-second hold, a frozen frame inside the clip with a red bar above it. The comparison of a freeze frame and a hold segment explains when each one is the better pause.
A gradual change from normal speed to slow motion and back is a speed ramp, and the speed ramp guide linked above walks through Blade Speed and speed transitions.
Reset a clip to normal speed
Select the clip or range and choose Retime > Normal 100%, or press Shift-N. Apple's page on resetting speed changes says this also removes reverse, rewind, and hold segments from the selection, so a reversed clip plays forward again. Apple's shortcut list also has Retime Reset, Option-Command-R, which resets the selection to play forward at 100%.
Play retimed clips smoothly
Every Video Quality option except Fast (Floor) needs rendering, and a retimed clip that isn't rendered can drop frames while you play it. Background rendering is off by default in Final Cut Pro 12.3 and later, as Apple's release notes confirm. With Background render enabled in Final Cut Pro > Settings > Playback, rendering starts after you stop working, as Apple's background rendering page explains. To render straight away, press Control-R for the selection or Control-Shift-R for the whole project, then judge the motion only after the render bar above the clip has cleared. If playback still stutters on a slow Mac, the speed itself may be fine; check it in an export of that range before changing settings.
Change clip speed on iPad
In Final Cut Pro for iPad, Apple's page on changing clip speed on iPad puts everything in one panel. Select the clip, tap Inspect, and tap Clip Speed:
- Drag the Playback Speed dial, or tap the percentage and type a value. Below 100% is slow motion; above is fast motion.
- Tap Retime Duration to type an exact length instead.
- Video Quality offers Fast (Floor), Fast (Nearest Frame), and Good (Frame Blending); Optical Flow and Machine Learning aren't in the iPad list.
- Preserve Audio Pitch, reverse playback, and freeze frames sit in the same panel.
When speed changes don't work
- Retime does nothing. The selection is a still image, title, generator, or theme. Larry Jordan's workaround for stills is to export them as a ProRes 4444 video, import that, and retime the video.
- Everything after the clip moved. Ripple was on. Undo, then use Retime > Custom with Ripple off.
- The slowed shot ends too early. With Ripple off and the next clip directly afterward, the slowed action can exceed the available interval. Turn Ripple on if later cuts may move, or make room for the full action and extend the clip. Recheck the following edit and music sync.
- Slow motion stutters. The clip is on Fast (Floor). Switch Video Quality to Good, Better, or Best, and render.
- Smooth Slo-Mo or Best isn't available. The Mac has an Intel processor; both need Apple silicon. Footage larger than 4K also needs an M2 or later.
- Speech sounds strange. Preserve Pitch was turned off, or the speed is too high for words to stay clear.
- There's no speed keyframe. Speed doesn't animate the way position or opacity do with keyframes in Final Cut Pro. A gradual change is a speed ramp built from speed segments.
- The file in Finder didn't change. Speed belongs to the project. Export the clip or project to get a retimed file.
What I'd do
For a quick speed-up, I'd use the Fast presets with Ripple on and adjust by ear against the music, because a preset and a playback pass take seconds. For slow motion, I'd shoot 120 fps or more when the action is fast, apply Automatic Speed, and only reach for Smooth Slo-Mo when the shot needs to go slower than the frame rate allows, because real frames are always the safest slow motion and the published tests show Smooth Slo-Mo is the method to trust for the rest.