
To crop video in Final Cut Pro, select the clip in the timeline, press Shift-C, and make sure Crop is selected at the bottom of the viewer. Drag a blue corner handle to cut away the edges, drag inside the box to place it, and click Done: the kept area expands to fill the frame. Black bars afterward mean Trim was selected instead of Crop, or the clip is set to Fit. Crop never changes the shape of the video; a square or vertical result comes from changing the project's frame size.
Below: the crop steps with exact edge values, Trim versus Crop versus Ken Burns, cropping to a new shape or an exact pixel size, how much picture a crop costs for common source and delivery sizes, published Smart Conform results, cropping many clips at once, a circle crop, photos, turning off and animating a crop, the iPad version, and fixes for crops that go wrong. Cutting a clip shorter in time is trimming, which the guide to trimming and splitting clips covers.
Crop a clip step by step
- Select the clip in the timeline and move the playhead over it, so its image shows in the viewer.
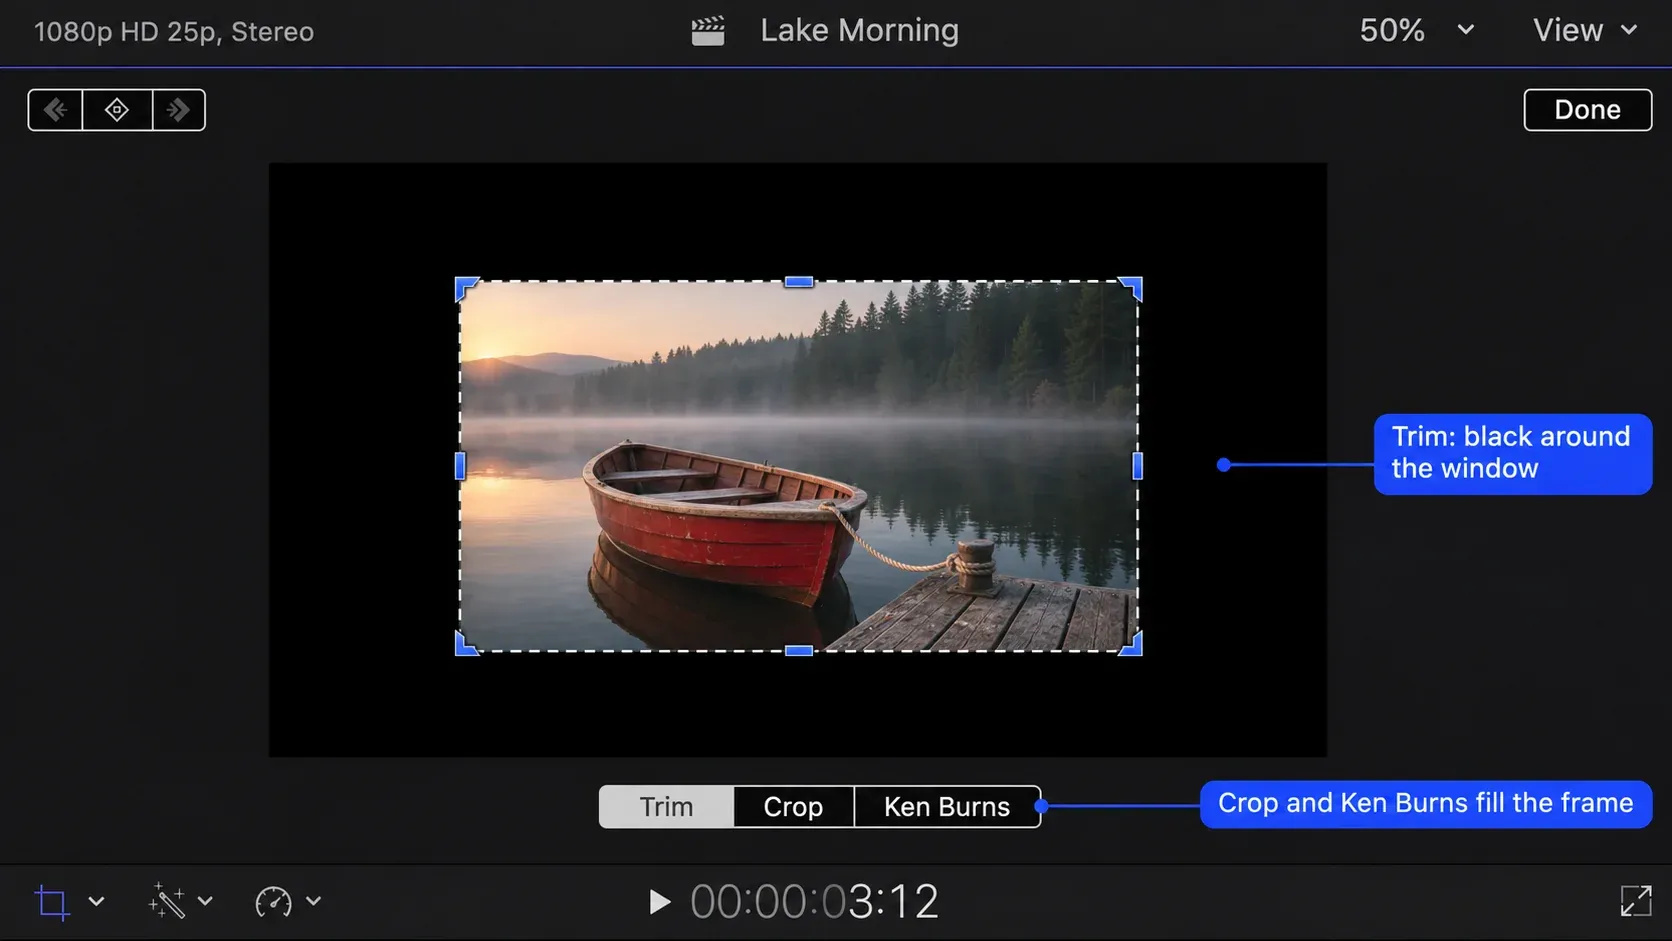
- Open the crop controls: press Shift-C, choose Crop from the pop-up menu in the lower-left corner of the viewer, or Control-click the viewer and choose Crop.
- Check that the Crop button at the bottom of the viewer is selected, not Trim or Ken Burns. The three share one set of controls, and the mode decides what Done does.
- Drag a blue corner handle toward the center. The box keeps the clip's aspect ratio, so one corner shrinks it evenly.
- Drag inside the box to move it over the part of the shot you want to keep.
- Click Done. The kept area scales up to fill the frame.
Apple's page on cropping clips lists the same three ways in and confirms that the cropped image always keeps the original aspect ratio. For exact numbers, select the clip, open the Video inspector (Command-4), and type values into Left, Right, Top, and Bottom in the Crop section. You can draw the box any shape there, but Apple notes the final image still comes out at the original aspect ratio, with extra content cut away so it fits.
Those fields show pixels or percentages, depending on the Inspector Units pop-up that Apple's General settings page places under Final Cut Pro > Settings > General; it changes Transform, Crop, and Distort together. I'd set it to Pixels for cropping, because a value like 240 off each side maps straight onto the frame size, while a percentage has to be worked out first.
Black bars after cropping? Check the mode
Trim, Crop, and Ken Burns sit side by side at the bottom of the viewer, and they give three different results once you click Done.
| Mode | What Done does | Black around the picture? | Use it for |
|---|---|---|---|
| Trim | Cuts the edges away and leaves the picture at its size | Yes, unless a clip sits underneath | Windows, insets, split-screen panels |
| Crop | Scales the kept area up to fill the frame | No | Removing a microphone, light stand, or clutter at the edge; tighter framing |
| Ken Burns | Moves from a start framing to an end framing over the whole clip | No | A pan or push-in across a shot or photo |
Most "my crop left black bars" problems are Trim mode. Apple's page on trimming the edges of the video frame describes the result as a window: corner handles move two sides, middle handles move one, and the picture never grows. That window over a background clip is how the panels in the split-screen guide are built.
Crop is the mode for cleaning up a shot. Apple's intro to built-in effects gives removing a microphone or lighting equipment from the edge of the frame as a typical use. Ken Burns animates between two crops, a green start and a red end, and the zoom guide covers it together with keyframed push-ins.
Crop to a different shape or an exact size
Crop can't turn a 16:9 clip into a square or vertical video, because its result always fills the project frame at the frame's existing shape. The shape belongs to the project, so change the project first, then position each clip inside the new frame.
- Select the project in the browser and choose Window > Project Properties (Command-J).
- Click Modify in the upper-right corner of the inspector.
- Choose Custom from the Format pop-up menu and type the width and height you need, or pick a listed format.
- Click OK.
Apple's project settings reference notes that the frame rate can't change unless the timeline is empty; the frame size has no such limit. When the original edit has to stay untouched, work on a copy: Control-click the project in the browser, choose Duplicate Project As, pick Vertical or Square from the Video Format pop-up menu, and select the Smart Conform checkbox that appears so Final Cut reframes every clip in the copy. Apple's page on square and vertical versions of a project adds that the new project opens with overscan view on, so the parts of each clip outside the frame stay visible while you adjust them.
In the new frame, a clip whose size differs from the project shows a Spatial Conform section in the Video inspector. Fit, the default, shows the whole clip with bars; Fill crops along the longer side to fill the frame; None keeps the clip at its own pixel size, as Apple's page on conforming frame sizes explains. For a vertical or square version, I'd choose Fill and then slide Position in the Transform section to bring the subject back into frame, because Fill already uses the smallest enlargement that covers the frame and Position moves the picture without scaling it further. The vertical video guide carries that through to titles and export.
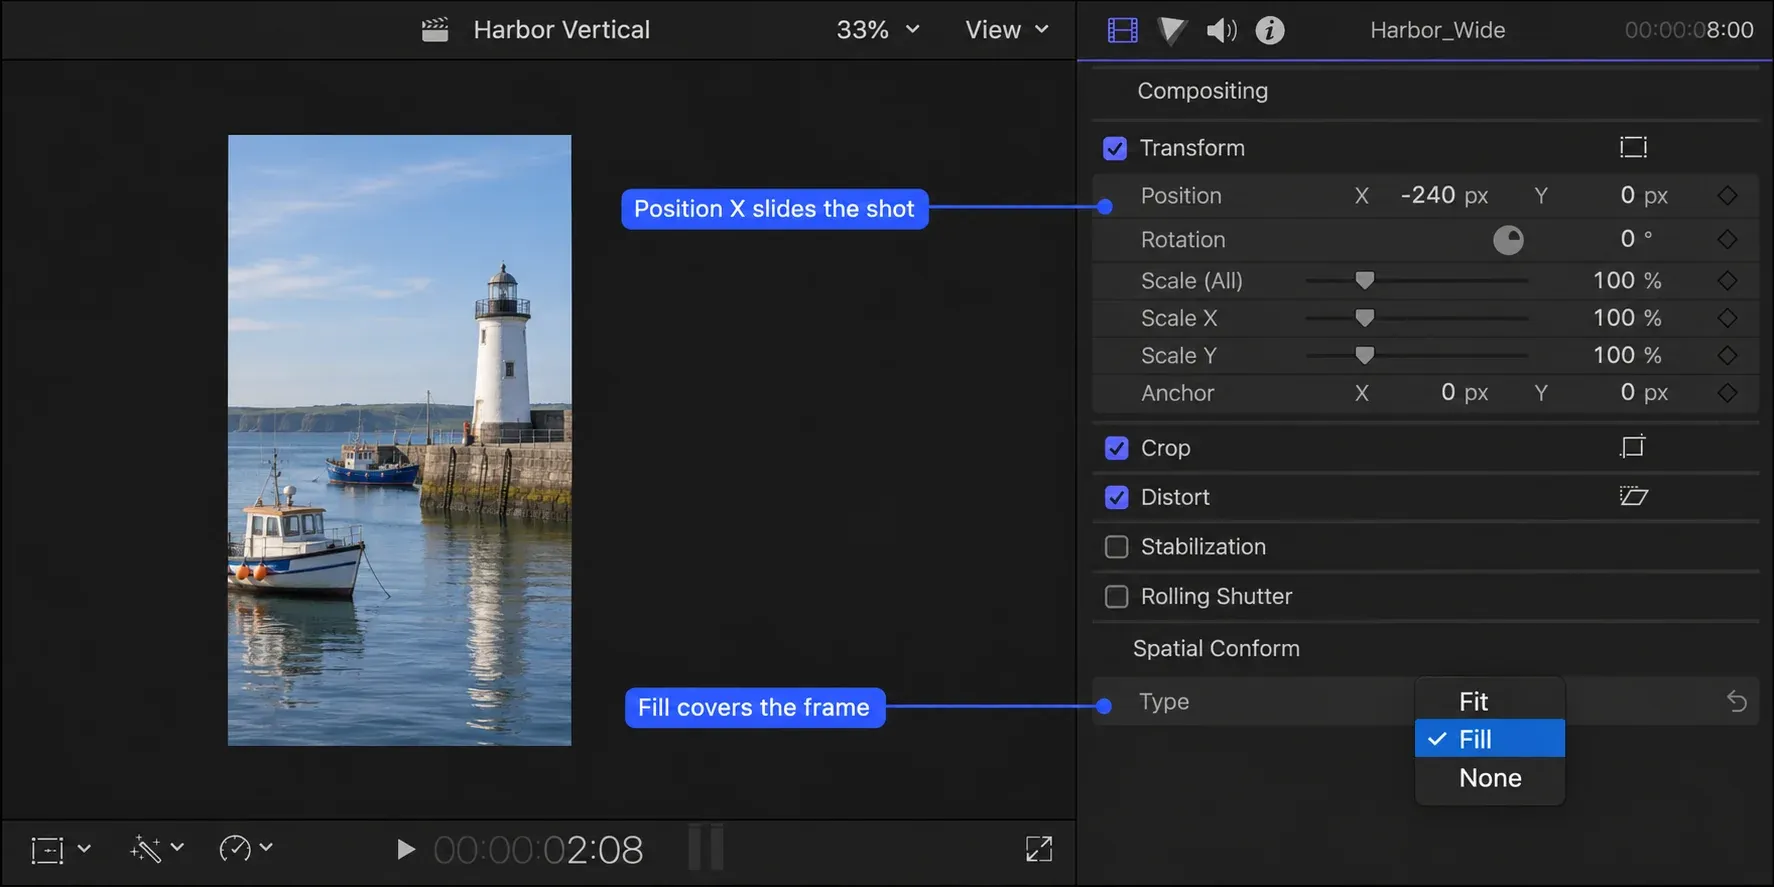
A crop to an exact pixel size, such as one window from a screen recording, follows the method from a Creative COW thread on cropping without black borders: make a project with a Custom resolution that matches the area you want, set Spatial Conform to None so the recording stays at its native pixels, then adjust X and Y Position in the Transform section until the right area fills the frame. Because the project can be any shape, this is also the answer to cropping without keeping the aspect ratio. The poster in that thread also found that recordings from a Retina display came out at double the pixel dimensions, so check the clip's real frame size before typing the custom resolution.
How much picture a crop costs: published results
Every crop throws away pixels. Once the kept area has fewer pixels than the project frame, Final Cut has to enlarge it, and enlargement is where softness starts. The table works this out from the frame dimensions for common source and delivery sizes: the largest area of the source that matches the delivery shape, and how far it has to be resized to fill the frame.
| Source clip | Delivery frame | Largest matching area | Resize to fill | Room to crop tighter |
|---|---|---|---|---|
| 3840 × 2160 (4K UHD) | 1920 × 1080 | 3840 × 2160 | 50% | 2× |
| 3840 × 2160 (4K UHD) | 1080 × 1080 | 2160 × 2160 | 50% | 2× |
| 3840 × 2160 (4K UHD) | 1080 × 1920 | 1215 × 2160 | 89% | 1.125× |
| 1920 × 1080 (HD) | 1080 × 1080 | 1080 × 1080 | 100% | None |
| 1920 × 1080 (HD) | 720 × 1280 | 608 × 1080 | 118.5% | None, already enlarged |
| 1920 × 1080 (HD) | 1080 × 1920 | 608 × 1080 | 178% | None, already enlarged |
Larry Jordan's examples illustrate the frame-size calculation. In his walk-through of Smart Conform in Final Cut Pro 11, he recommends a 720 × 1280 vertical project for HD footage, which enlarges the source about 18% and blurs it slightly, and 1080 × 1920 for 4K, which downscales the source. Larry Jordan's first look at Smart Conform, written for the 10.4.9 release, lists a rounded 608 × 1080 vertical frame for HD footage without enlargement. Mark Spencer, demonstrating crop reframing in a MacBreak Studio episode on ProVideo Coalition, says native-resolution footage can be scaled up "perhaps 5-10%" with little loss and highlights the extra reframing room of 4K clips in a 1080 timeline.
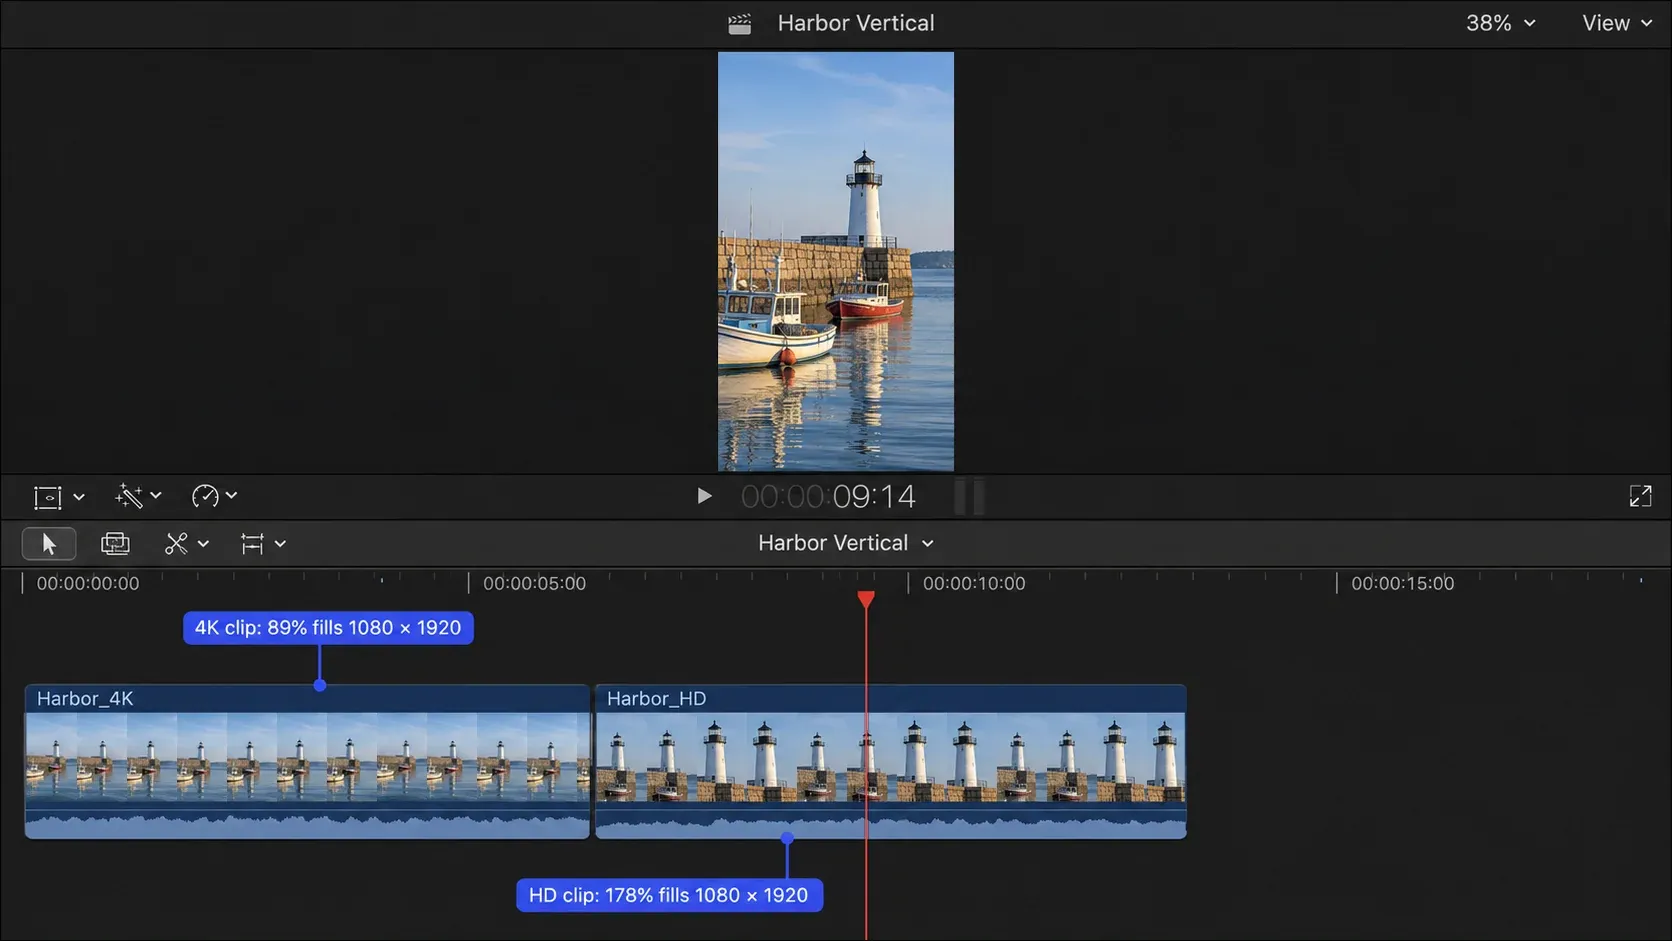
Larry Jordan's Smart Conform demonstrations show specific limits. In his 2020 example, it switched the clip's Spatial Conform from Fit to Fill while Scale still read 100%, and shifted one shot 70.8 pixels sideways. On a train crossing the frame it found the right starting position but didn't follow the train, so the fix was keyframing X Position; it also left titles, generators, and compound clips alone. In his 2025 Final Cut Pro 11 example, a 90-second project had eight shots, five titles, and an opening graphic. The talking-head shots were repositioned and scaled where needed, while a title was lost and the opening graphic was cropped, so his advice is to rework titles and graphics after conforming. He gives a processing estimate of a few seconds to a few minutes depending on clip count. His vertical-to-horizontal example filled the frame rather than creating a blurred background.
My verdict: 4K gives useful crop room for 1080p or square delivery, but a 1080 × 1920 vertical frame has only 12.5% extra zoom before upscaling, so I'd keep vertical reframing modest. From HD, a 1080 × 1080 square already uses the full height, so any tighter crop requires enlargement, and a full-size 1080 × 1920 vertical frame needs a 78% blow-up. For HD footage headed to vertical, I'd follow Larry Jordan and deliver 720 × 1280 when the destination accepts it, because it needs an 18.5% enlargement rather than 78%. Smart Conform earns its place as a first pass on talking heads; check titles, graphics, and framing through each moving shot.
Reframe a whole project with Smart Conform
- Change the project's frame size with Modify, as above, or make a Square or Vertical copy with Duplicate Project As and select Smart Conform there.
- In a project whose frame you changed with Modify, select the clips whose aspect ratio differs from the project, then choose Modify > Smart Conform.
- Wait while Final Cut analyzes each clip for faces and other areas of visual interest and reframes it.
- Play through every clip and adjust Position in the Transform section of the Video inspector where the framing misses.
Apple's page on adjusting framing with Smart Conform describes it as keeping faces and other important elements from being left outside the frame, and points to the Position parameter for anything it gets wrong. It analyzes the clips as they sit in the timeline, so finish trimming and splitting first, giving each scene its own clip to analyze.
Crop many clips at once
- Select the cropped clip and choose Edit > Copy (Command-C).
- Select the clips that need the same crop.
- Choose Edit > Paste Attributes (Shift-Command-V).
- Select Crop under Video Attributes and leave the other checkboxes cleared.
- If the crop is animated, choose Maintain to keep the original keyframe spacing or Stretch to Fit to spread the keyframes across each clip, then click Paste.
Apple's page on copying effects between clips uses crop settings as its example for Paste Attributes. Paste Effects (Option-Command-V) is quicker but copies all of the source clip's effects, so a color correction or Transform change comes along with the crop. Paste Attributes is the safer choice for crops, since it moves the crop and nothing else.
For one framing shared by a long run of shots, an adjustment clip is the other route. Apple's Final Cut Pro release notes list adjustment clips in version 11.1: put the playhead or a range selection over the shots, choose Edit > Add Adjustment Clip (Option-A), and it appears in the timeline as a connected clip. Apple's page on adding adjustment clips says built-in effects applied to it apply to every clip below it in the timeline, so a crop set there reaches the whole stretch it covers. When the framing differs from shot to shot, copy the crop with Paste Attributes instead.
Make a circle crop
Crop always returns a rectangle at the frame's shape, so a circle needs a mask.
- To show the circle over another shot, connect the clip above that background clip first. Then select it and put the playhead over it.
- Open the Effects browser (Command-5), type "shape" in the search field, and drag Shape Mask onto the clip or the viewer.
- Drag the curvature handle, just left of the top handle, to the round end of its range.
- Pull the top and side handles until the shape is as tall as it is wide; Shift-drag a handle afterward to resize it without changing that shape.
- Place the circle by dragging its center. Move the outer circle close to the inner one for a hard edge, or away from it for a soft one.
Those handles come from Apple's page on simple shape masks, which starts every Shape Mask as a partially feathered ellipse in the middle of the frame and notes that compositing over a background requires connected clips. To hide something inside the frame instead of cropping it away, the face blur guide covers masks that follow a moving subject.
Crop a photo
A photo in the timeline takes the same Crop, Trim, and Ken Burns controls as a video clip, so the steps above work unchanged. Two things differ. Photos rarely match the project's frame size, so Spatial Conform decides whether the picture starts with bars (Fit) or already fills the frame (Fill). And a large photo usually has far more pixels than a 1080p or 4K frame, so it takes a much tighter crop than a video clip before it softens. For a slow move across a photo, Ken Burns or a keyframed crop from the zoom guide does the job.
Turn off, reset, or animate a crop
Apple's page on working with built-in effects covers all three. The blue checkbox next to Crop in the Video inspector switches the crop off and on without losing its values, which makes it the quickest before-and-after check. The Reset button in the Crop section returns the clip to its full frame.
To animate a crop, put the playhead where the move starts, open Crop, frame the shot, and click Add Keyframe at the top of the viewer. Move the playhead, reframe, and Final Cut adds the next keyframe automatically; click Done when the path is complete. The Video Animation editor (Control-V) shows those keyframes on the clip, and the keyframes guide covers easing and copying them. I'd animate the crop instead of using Ken Burns whenever the move needs a stop in the middle, because Ken Burns only ever has a start and an end.
Crop on iPad
Final Cut Pro for iPad keeps cropping in the inspector. Tap the clip in the timeline, drag the playhead over it, tap Inspect in the lower-left corner, tap the top of the inspector, then tap Crop Tools; you may need to scroll down. In the viewer, a corner handle trims two sides at once and a side handle trims one, or set each edge with the keypad from the Crop tab. Turn on Scale to Fill to make the cropped image fill the frame, tap Reset to start over, tap Disable to compare, and double-tap the viewer when you're done.
The iPad version adds Auto Crop. Under Crop Tools, tap Auto Crop, then Start Scan: Final Cut analyzes a clip whose shape differs from the timeline and keeps adjusting the framing through the clip to hold faces or other areas of interest in view. Apple's page on cropping and reframing clips on iPad covers both tools and adds that a clip of a different shape gets Scale to Fit by default, with black bars, until you switch it to Scale to Fill. That moving framing is exactly what Larry Jordan's train shot needed on the Mac.
When the crop goes wrong
- Black bars after clicking Done. Trim was selected. Select Crop at the bottom of the viewer and drag a corner again; Crop scales the kept area to fill the frame.
- Bars at the sides before any crop. The clip's size or shape differs from the project and Spatial Conform is set to Fit. Switch it to Fill in the Video inspector.
- The crop box won't change shape. Corner handles keep the clip's aspect ratio by design. Change the project frame for a new shape, or use Trim for a window of any shape.
- The cropped picture looks soft. The kept area has fewer pixels than the project frame. Check it at 100% from the Zoom pop-up in the viewer, crop less, or start from higher-resolution footage. A stabilized clip that needs an extra crop to hide black edges spends the same pixels, a trade-off the stabilization guide covers.
- No crop handles in the viewer. The clip isn't selected or the playhead isn't over it. Select it in the timeline and park the playhead on it.
- The crop disappeared. The blue Crop checkbox in the Video inspector is cleared. Select it again; the values are still there.
- Titles are cut off after Smart Conform. Smart Conform doesn't reframe titles or generators. Reposition or rebuild them in the new frame.
- A pasted crop moves at the wrong speed. The crop was animated and the clips differ in length. Paste again and switch between Maintain and Stretch to Fit.
- A screen recording looks zoomed in. It was recorded at double pixel size on a Retina display and Spatial Conform is set to None. Use Fit, or a custom project the size of the area you want.
What I'd do
For a quick cleanup, I'd crop in the viewer and finish with typed Left, Right, Top, and Bottom values, because pixel values are easy to repeat across shots. For a new shape, I'd change the project frame first and only then crop or position each clip, since Crop by itself never changes the shape of the output. 4K leaves more crop room for 1080p or square delivery than for a 1080 × 1920 vertical frame. For HD footage going vertical, choose 720 × 1280 only when the destination accepts that size, then check sharpness in the export. Smart Conform gets the first pass on talking heads, followed by a check of every title, graphic, and moving subject before export.