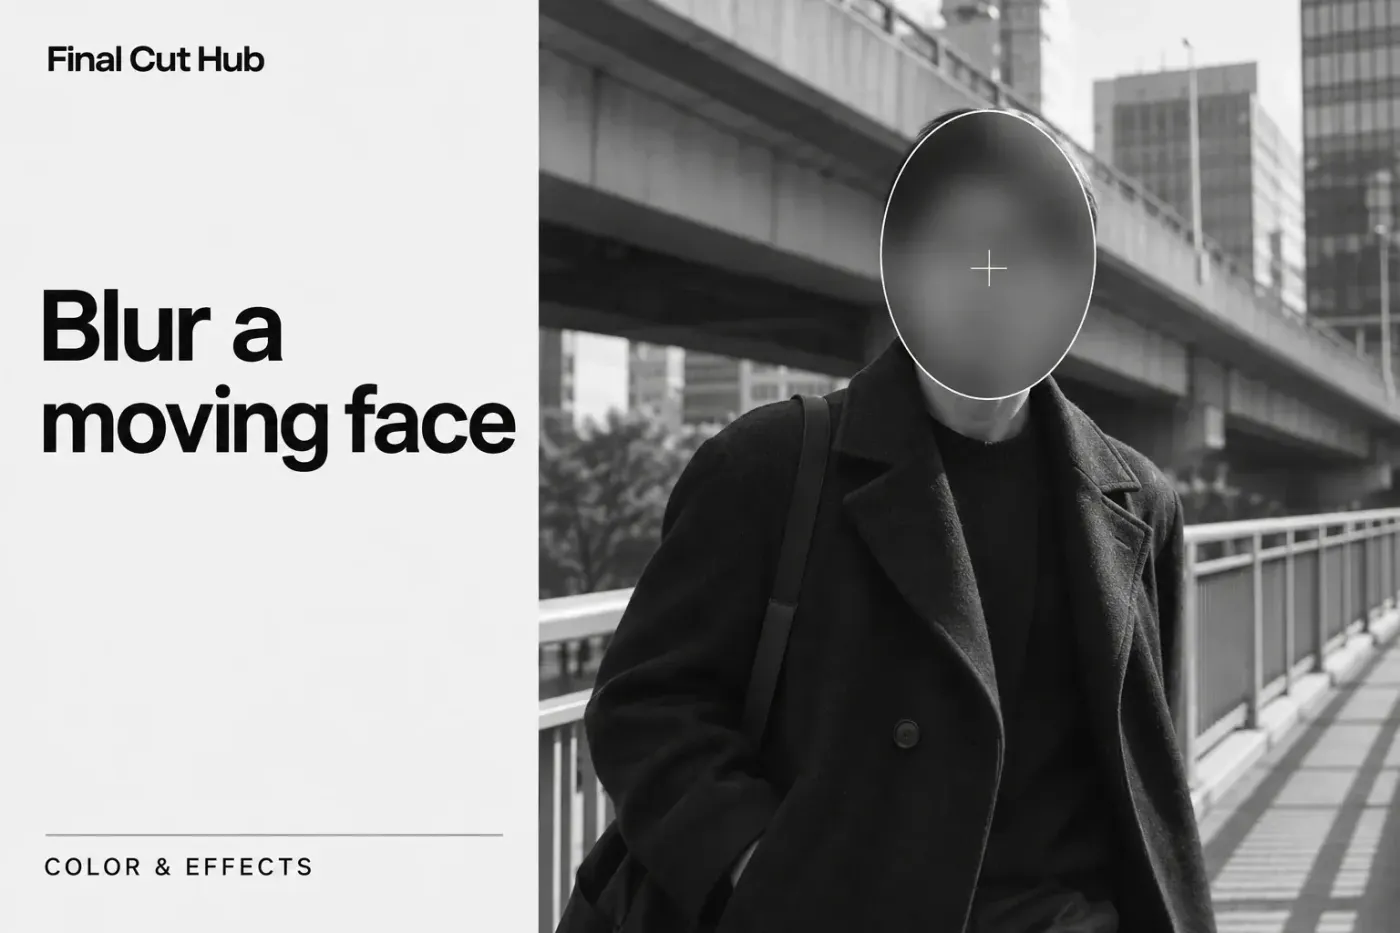
To blur a face in Final Cut Pro, choose Final Cut Pro > Settings, click General, and set Drop Effect in Viewer to Add Tracker. Then drag the Gaussian effect from the Blur category of the Effects browser onto the face in the viewer, let go when an oval appears over it, and click Analyze: the blur's shape mask now follows the face through the clip. In Final Cut Pro 12.3 and later, Auto Mask is Apple's fastest route for a recognized face, picked straight from the effect's mask menu. I'd start with the tracker for a privacy blur, because its soft oval covers the whole head with margin to spare, while a recognition mask hugs the outline and has to be widened before it hides hair and ears.
Below: which route fits which shot, the blur effect to pick, tracker steps with the settings that decide the result, Machine Learning versus Point Cloud, repairing a track that slips, several faces, license plates and screens, blurring everything except one person, the Auto Mask and Magnetic Mask routes, a keyframed fallback, published analysis times, and checks before export. This guide is about hiding something in the frame; the streaky motion blur that fast movement leaves behind is a different effect.
Pick the route for your shot
Final Cut Pro has four ways to keep a blur on a subject, and they arrived in different versions. Apple's Final Cut Pro release notes date object tracking to 10.6, a new machine-learning face model for the tracker on Apple silicon to 10.7, Magnetic Mask to 11.0, and Auto Mask to 12.3. Check your version under Final Cut Pro > About Final Cut Pro before choosing.
| Shot | Route | Version | Why it fits |
|---|---|---|---|
| A face moving through the frame | Object tracker with Gaussian | 10.6 or later | A soft oval with room to spare, set up with one drag and one Analyze click |
| A clearly visible face, quick job | Auto Mask on Gaussian | 12.3 or later | Recognizes faces, people, and hair and follows them without a tracker pass |
| An odd-shaped object, such as a product or a phone in a hand | Magnetic Mask on Gaussian | 11.0 or later | Masks whatever you click, not a fixed list of types |
| A license plate, sign, or screen | Object tracker set to Point Cloud | 10.6 or later | Locks onto rigid, flat regions precisely |
| A locked-off shot where the subject stays put | Shape mask or Censor, no tracking | Any version | Nothing moves, so there's nothing to track |
| A shot every automatic route loses | Shape mask animated with keyframes | Any version | Full manual control, frame by frame where needed |
All of these work the same way underneath: the blur effect gets a mask, and only the masked area is blurred. That's why the choice of effect and the choice of mask are two separate decisions.
Which blur effect to use
Gaussian, in the Blur category of the Effects browser (Command-5), is the one I'd reach for, because it blurs evenly, Amount sets the strength, and the mask alone decides where the blur lands. Apple uses it as the example on its page about adding a shape mask to a video effect, and Larry Jordan calls it his favorite all-round blur in his walk-through of the blur effects in Final Cut Pro.
Censor, in the Stylize category, is built for the job by name: it blurs, pixelates, or darkens a circle or a rectangle, with Radius and Aspect setting its size. It also carries its own center circle, which you drag in the viewer to place it, as Apple's onscreen control examples show. Apple's tracker steps move an effect's shape mask, so Censor on a tracked subject means lining up two shapes. Keep it for static shots and keyframed paths.
For identity protection, strength matters more than looks. A light blur can leave a face recognizable, so push Amount well past the point where the face first goes soft, then check it at full screen. In his list of hidden Final Cut Pro effects, Larry Jordan recommends Censor's Darken option to hide an identity, since a black disc hides more than blur or pixelate.
Blur a moving face with the object tracker
Stabilize before you track. Apple asks for stabilization and retiming before Magnetic Mask analysis, and the same order suits the tracker, so the track is analyzed on the final, steadied image. The stabilization guide covers the settings.
- Move the playhead to a frame where the face is clear and sharp. Apple's page on tracking an effect to a moving object says the tracker does best on an object that's in focus with high-contrast detail.
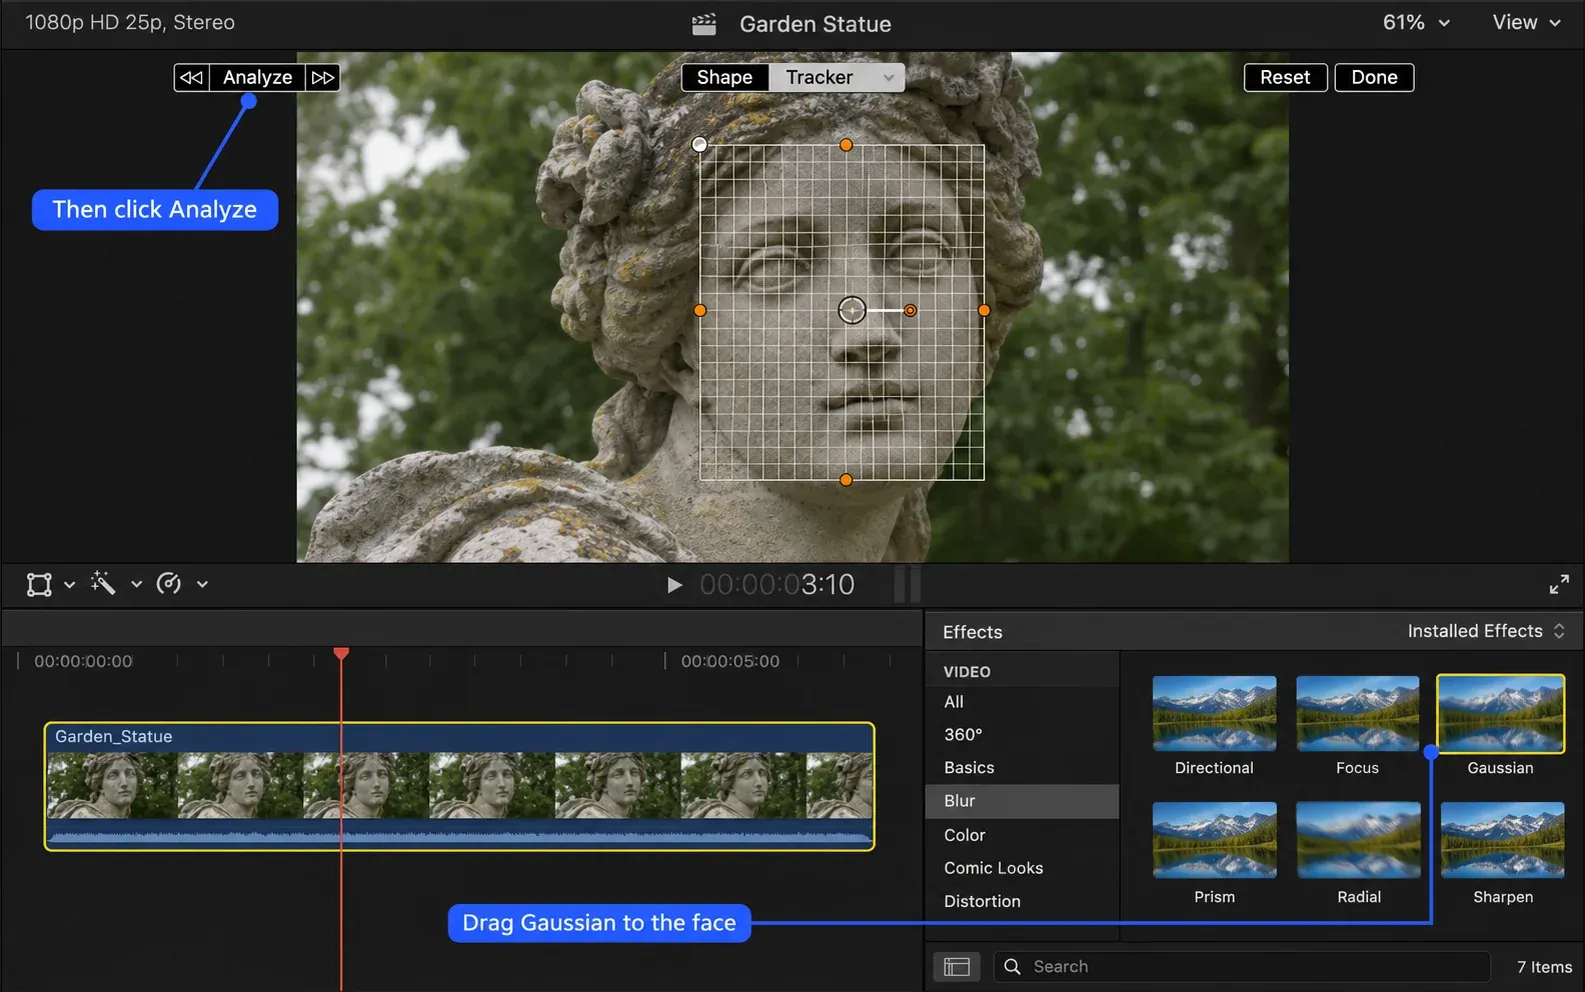
- Choose Final Cut Pro > Settings (Command-Comma), click General, and set Drop Effect in Viewer to Add Tracker. Holding Command while you drag switches to the other option for that one drag.
- Open the Effects browser (Command-5), click Blur, and drag Gaussian onto the viewer.
- Move the pointer over the face. Rectangles appear over objects and ovals over faces; release when the oval sits on the face you want to hide.
- Drag the sides and corners of the tracker grid until it fits the face tightly. Apple warns that background caught inside the grid can confuse the tracker.
- Check that Tracker is selected at the top of the viewer, then click Analyze in the viewer's upper-left corner. Final Cut Pro tracks forward from the playhead, then backward, until the whole clip is done. The arrow buttons beside Analyze track only before or only after the playhead.
- Skim back to the start and play the clip. Select Gaussian in the Video inspector (Command-4) and raise Amount until the face can't be read.
The tracker's box hugs the face, so the blur does too. To cover hair, ears, and a little margin, unpin the mask first: select the effect's shape mask in the Video inspector, click the down arrow next to Tracker at the top of the viewer, and choose Behavior > Offset from Tracker. Apple's page on offsetting a tracking effect says the shape can then be resized and repositioned independently of the tracked object. Click Shape at the top of the viewer, drag the inner handles outward, and drag the outer circle to set how soft the edge is.
Unpin before you reshape, not after. Apple notes that editing a pinned shape mask after analysis overwrites the tracking keyframe at the playhead, which can make the blur jump at that frame.
Machine Learning or Point Cloud
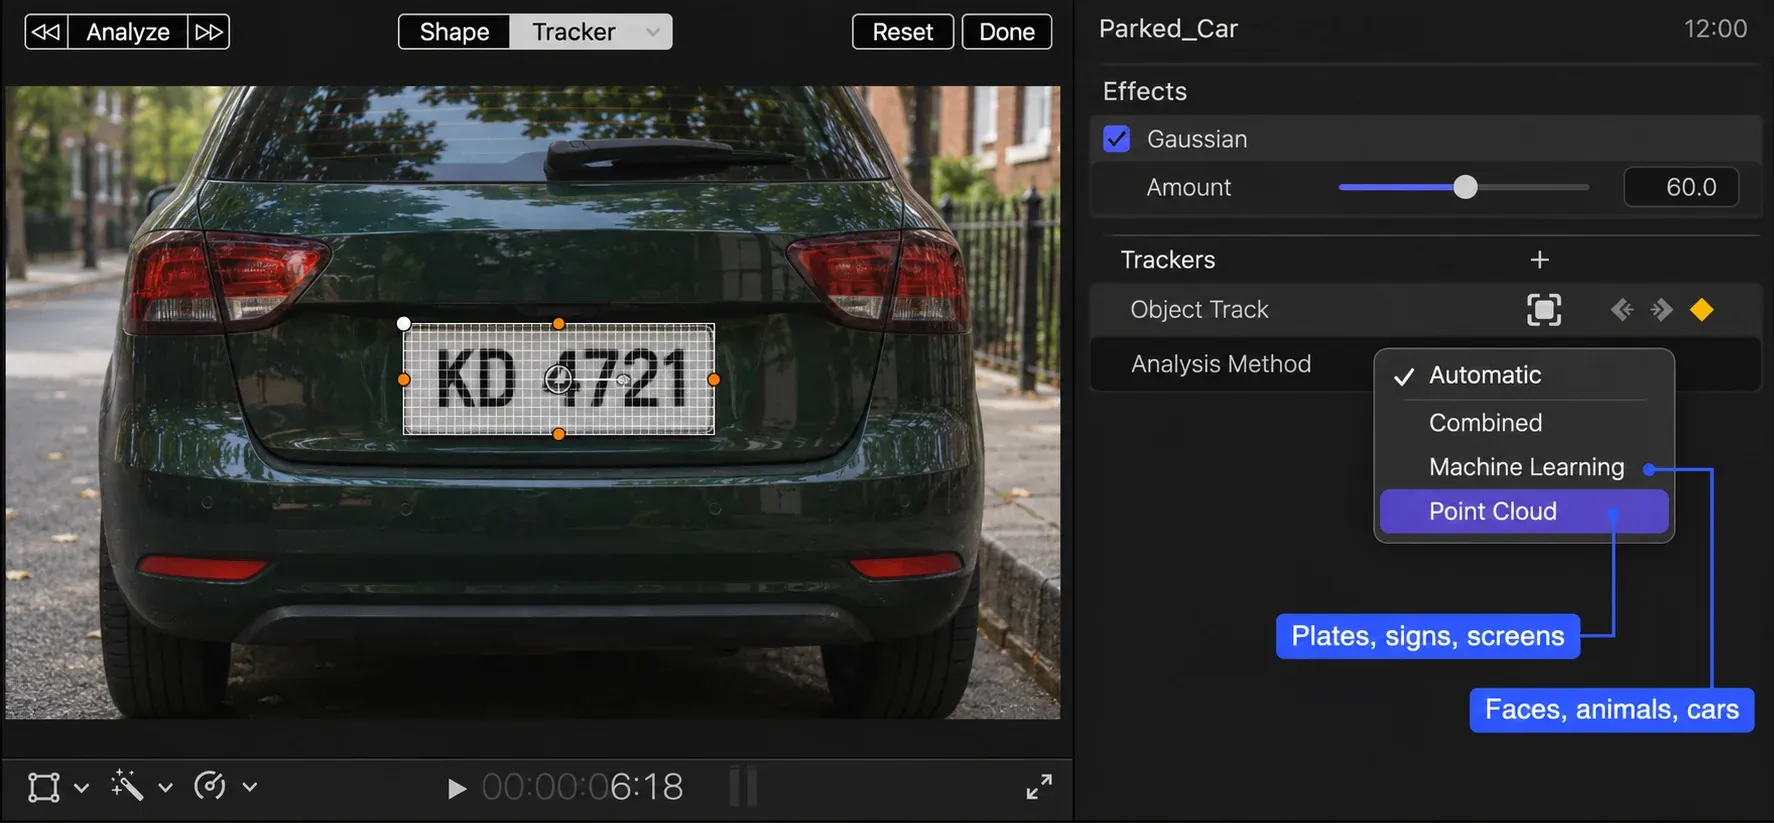
The tracker has two analysis methods, and the right one depends on what you're hiding. Apple's page on changing the tracking analysis method describes four settings:
- Machine Learning recognizes common objects such as faces, animals, and cars, and keeps tracking through moderate occlusion, such as a subject passing behind a tree for a few frames.
- Point Cloud suits regions that are rigid and roughly flat, such as a sign, a plate, or a screen. Apple suggests it when Machine Learning makes the box jitter.
- Combined uses a combination of Machine Learning and Point Cloud.
- Automatic lets Final Cut Pro pick the most suitable method.
The setting lives in the Trackers section of the Video inspector, under Analysis Method. To rerun an existing track with another method, pick the method, click the down arrow next to the tracker, choose Reset Tracker, and click Analyze again. Apple also notes that Macs with Apple silicon use an enhanced machine-learning model, so the same clip can track differently on an Intel-based Mac. The system requirements guide covers what each kind of Mac can run.
Fix a track that slips
Most bad tracks fail for a stretch, not the whole clip: a hand crosses the face, the person turns away, or fast movement smears the detail. Open the Tracking Editor with Clip > Show Tracking Editor (Option-Command-T), select the bad section by dragging across it, and click Analyze to redo just that range. If it still fails, select the range and click Delete. Apple's page on adjusting object tracking says Final Cut Pro interpolates between the tracking keyframes on either side of a gap, the same way it does with animation keyframes.
Where the tracker can't read anything at all, set the position yourself. Select the tracker in the Trackers section, move to the frame, and click the Keyframe button, but only after the Behavior pop-up in the Tracker controls is set to Pin to Tracker; Apple says that's what makes the keyframe land on both the track and the blur's shape mask. If something passing in front of the face is the cause, switch Analysis Method to Machine Learning and reanalyze first, since occlusion is the case it's built for.
Blur several faces
Each face needs its own track. Apple's tracker page says you can repeat the drag-and-analyze steps, with the same effect or a different one, to track other objects in the same clip. Drop Gaussian on the second face, wait for its oval, and click Analyze again. Rename each tracker after the person it follows by double-clicking its name in the Trackers section, because three trackers with near-identical names get confusing the first time one needs repair.
When two people move together, such as a couple walking side by side, one wide shape offset from a single tracker can cover both faces. It's quicker, and it stops working the moment they separate.
Blur a license plate, a screen, or text
Plates, signs, laptop screens, and name badges are rigid and flat, which is Point Cloud's strength. Drag Gaussian onto the object, release when the rectangle appears, fit the grid to its edges, set Analysis Method to Point Cloud in the Trackers section, and then click Analyze. Unpin with Offset from Tracker, click Shape, and drag the roundness handle, just left of the inner circle's top handle, to square the corners until the blur matches the rectangle.
Text needs more blur than a face. Small type can stay legible through a soft Gaussian, so raise Amount until the letters merge, and keep the inner shape slightly larger than the text so the feathered edge doesn't fall across the first or last characters.
Blur everything except one person
Flip the mask instead of building a new one. Apple's page on inverting effect masks says that once an effect has a shape mask, a Magnetic Mask, or an Auto Mask, you can click the down arrow next to the effect's name in the Video inspector and choose Invert to swap the masked and unmasked areas. A tracked Gaussian plus Invert keeps the subject sharp and softens everything around them, which also calms a busy background behind an interview.
For a subject who stays in one place in a static shot, the Focus effect in the Blur category does this in one step. Larry Jordan describes it as a sharp area surrounded by an increasingly blurry image, with Amount, Softness, size, and Center controls. When the subject was filmed on green, a key gives a cleaner separation than any blur, and the green screen guide covers edges and spill.
Auto Mask: the quickest route in 12.3
- Select the clip in the timeline and double-click Gaussian in the Effects browser to apply it.
- Put the playhead on a frame where the face is clearly visible.
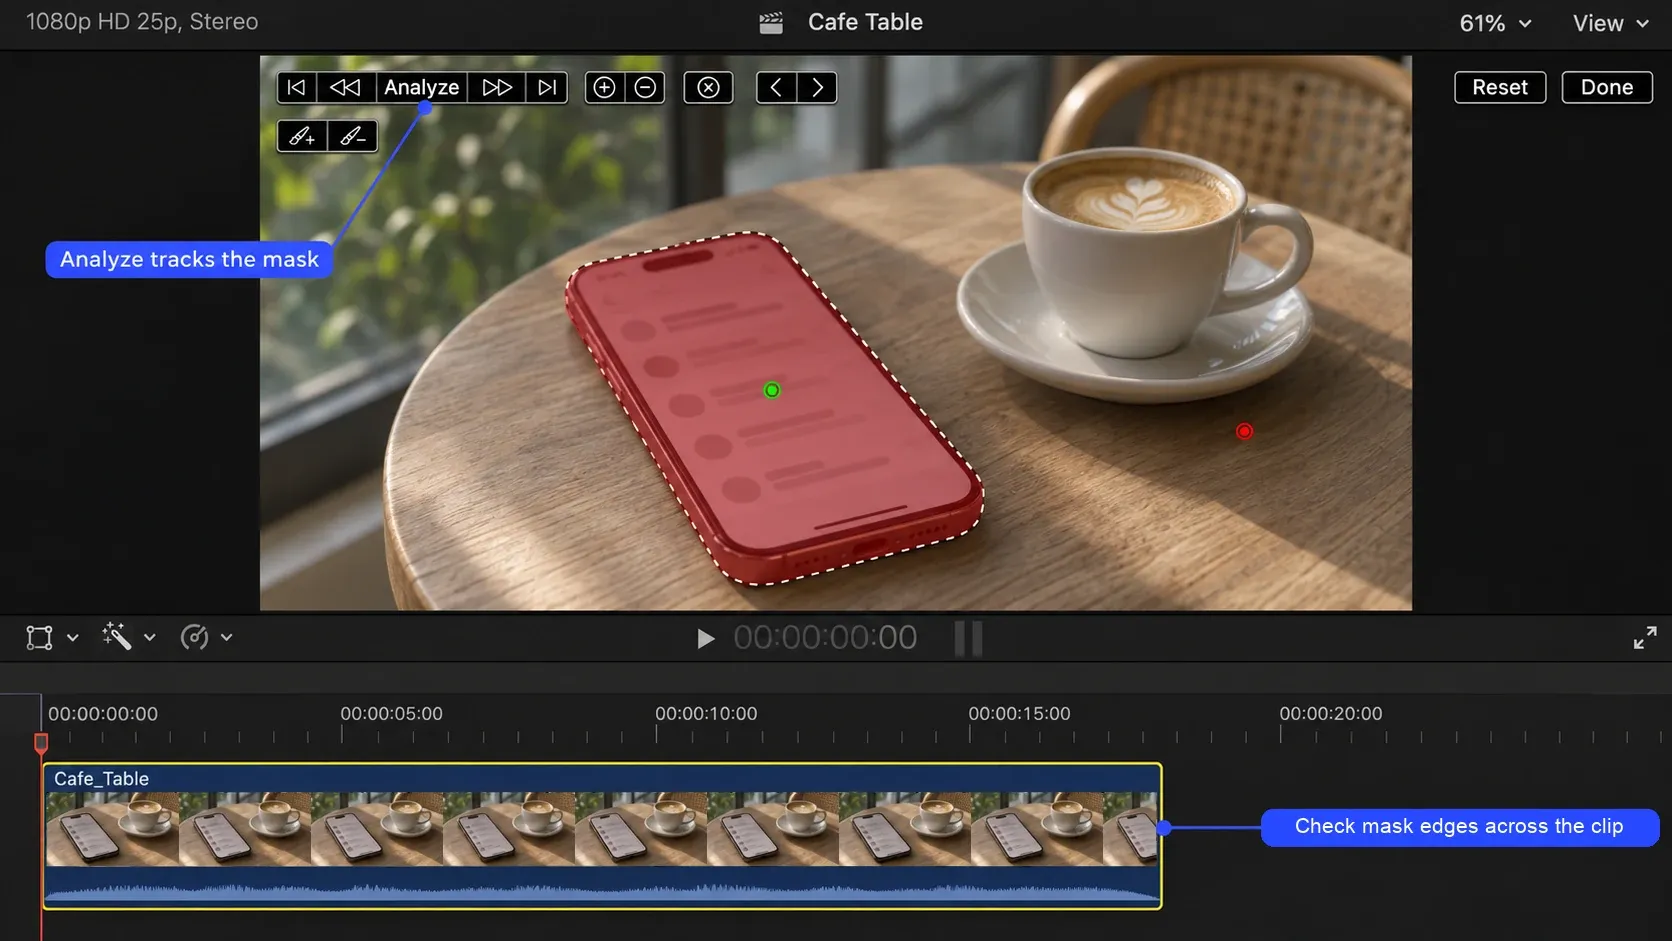
- In the Video inspector, click the Add Intelligent Mask button to the right of Gaussian's name and choose Auto Mask.
- Point at the face in the viewer and click the highlighted mask, or tick its thumbnail in the Auto Mask menu. Tick more than one to blur several people or features at once.
- Click Add Auto Mask.
Apple's page on adding an Auto Mask to a video effect lists what it recognizes: people, facial features, hair, skin, clothing, skies, foliage, and animals. Its steps include no Analyze click, and Apple's page on Auto Mask and Magnetic Mask in color correction says Final Cut Pro tracks the item through the clip with machine learning and applies the mask in each frame automatically.
Because the mask follows the outline, widen it before trusting it with someone's identity. Apple's page on using the Auto Mask lists a Shrink/Expand slider that grows the mask and a Blur slider that softens its edge. I'd drag Shrink/Expand right until hair and ears sit inside the mask, because a sharp ear or hairline can be enough for someone who knows the person.
Magnetic Mask for objects Auto Mask doesn't list
Apple's Magnetic Mask guidance adds rules worth knowing before you start: apply stabilization or retiming before you analyze, don't copy the clip to a timeline with a different frame rate, and don't move clips inside a compound clip that contains a mask. Copy Effects leaves the mask behind, and Apple notes that Magnetic Mask performs best on a Mac with Apple silicon.
Magnetic Mask, added in Final Cut Pro 11, isolates whatever you click rather than a fixed set of types, which makes it the route for a product on a table, a bag, or a phone in someone's hand. Apple's page on adding a Magnetic Mask to a video effect gives two ways in: set Drop Effect in Viewer to Add Magnetic Mask and drag the effect onto the object, or click Add Intelligent Mask next to the effect's name and choose Magnetic Mask.
Click the object, then refine the selection with the Add and Remove eyedroppers; holding Option switches between them. Apple says extra control points stop making a measurable difference after about 20. Click Analyze to mask the whole clip, play it back, and click Done in the upper-right corner of the viewer.
No tracker: keyframe the mask by hand
On a locked-off shot where the person barely moves, skip tracking. Click Add Shape Mask next to the effect's name, place the oval over the face, and the job is done.
When the subject moves and no automatic route holds, animate the shape yourself. Apple's page on animating an effect shape mask has the steps: put the playhead where the movement starts, position the shape, and click the Keyframe button for the mask in the Video inspector. Then move along the clip, reposition the shape, and add the next keyframe, more often wherever the subject changes speed or direction. Press Control-V to see the keyframes in the Video Animation editor; the keyframes guide covers editing and easing them.
How long does the analysis take? Published test results
Adam Talks Tech reports 18-second Magnetic Mask jobs in five Mac comparisons. Use the paired results within each linked review when comparing hardware; these timings cover Magnetic Mask analysis, not the object tracker or Auto Mask.
| Mac | Analysis time |
|---|---|
| Mac mini, M6 | 17 seconds |
| MacBook Pro, M5 Pro | 23 seconds |
| Mac mini, M5 Pro | 23.9 seconds |
| Mac Studio, M5 Max | 24.7 seconds |
| MacBook Pro, M5 | 26 seconds |
| Mac Studio, M4 Max | 27 seconds |
| MacBook Air, M5 | 28 seconds |
| Mac mini, M4 Pro | 28.9 seconds |
| Mac mini, M4 | 33 seconds |
The M6 and M4 Mac mini times come from the M6 versus M4 Mac mini test, the M5 Pro and M4 Pro Mac mini times from the M5 Pro versus M4 Pro Mac mini test, and the Mac Studio times from the M4 Max versus M5 Max Mac Studio test. The laptop figures come from the M5 Pro versus M5 MacBook Pro guide and the M5 MacBook Air versus MacBook Pro comparison. The Studio comparison uses different configurations: a 40-core-GPU M4 Max with 64GB of memory and a 32-core-GPU M5 Max with 36GB. The reviews don't establish one Final Cut Pro/macOS version or a repeated-run statistic for all nine Macs, so I'd compare the paired results within each review.
Two more publishers fill in the picture. Nino Leitner's CineD review of Magnetic Mask, run on a 16-inch M2 Max MacBook Pro with 64 GB of RAM, puts rendering Magnetic Masks at probably around 70% of real time for UHD footage at 25 frames per second, and a shot whose selection needed several extra clicks was still masked in about two minutes. Larry Jordan's comparison of AI-assisted masking in Final Cut Pro 12.2, Premiere 26.2, and the DaVinci Resolve 21 beta found Final Cut Pro the easiest and fastest to use, with problems on hair and shadows, while the Studio version of Resolve made the best mask.
I'd budget time for checking the mask edges, because the hair and shadow problems in Larry Jordan's comparison are exactly the detail a privacy blur must cover. Expand the blur where needed and inspect the whole exported clip; a completed analysis isn't a privacy check. These timings measure Magnetic Mask only, not the object tracker or Auto Mask.
Before you export
- Play the whole clip at full screen and skim slowly through every turn, crossing, and the first and last frames. To see exactly what the mask covers, click View Masks next to the effect's name and choose Black and White.
- The blur is rendered into the exported file, while the original media in your library stays untouched. Send the export, never the library or the camera originals, to anyone who shouldn't see the face.
- Magnetic Masks aren't included in XML exports, so a project handed to another app through XML arrives without them. Re-create the blur there or deliver a rendered file.
- If playback stutters, render the section with Control-R before judging the blur, then export with the settings in the export guide.
What I'd do
For an interview subject or a passer-by, I'd set Drop Effect in Viewer to Add Tracker, drop Gaussian on the face, set the method to Machine Learning, click Analyze, then switch to Offset from Tracker and widen the oval past the hair, because a generous soft oval hides more than a tight outline and holds up through a head turn. On 12.3 with a clearly visible face, I'd try Auto Mask first and expand it, since it skips the tracker pass entirely. For a plate or a screen, Point Cloud with squared corners does the job, and before any export the whole clip gets one slow full-screen watch.