In Final Cut Pro for Mac, Magnetic Mask uses machine learning to isolate a person, object, or shape and extend that selection across a video clip. Choose Modify > Add Magnetic Mask, click the subject with the Add eyedropper, then analyze the frames you need and play them back. The standalone effect creates a matte for compositing the subject over another background; using it to limit a different effect is a separate job.
Add the mask to a clip
Apple's best-practices notes matter when a project is complex. Apply retiming or stabilization before adding Magnetic Masks. Avoid moving clips inside a compound clip that contains a Magnetic Mask, and avoid copying a masked clip to a timeline with a different frame rate. Magnetic Masks are also not included in XML exports or when you copy effects between clips.
- Add the clip to the timeline and select it.
- Place the playhead on a frame that clearly shows the subject or object you want to isolate.
- Open the Effects browser and choose Magnetic Mask. To find it quickly, search for “magnetic” in the browser.
- Drag the effect onto the object in the viewer, drag it to the timeline clip, double-click the effect thumbnail, or choose Modify > Add Magnetic Mask.
When you drag the effect over the viewer, Final Cut Pro highlights possible objects and shapes. If the highlighting does not appear, open the Drop Effect in Viewer setting in Final Cut Pro Settings > General and choose Add Magnetic Mask instead of Add Tracker.
Refine the selection before analyzing
After the mask is added, use the Add eyedropper in the viewer to select the object. With the Add eyedropper, click areas that should remain inside the mask. Choose Remove and click areas that should be excluded. Each Add click places a green control point; each Remove click places a red one. I'd keep the points few: in most cases a small number is enough, and adding points everywhere can make the selection harder to understand.
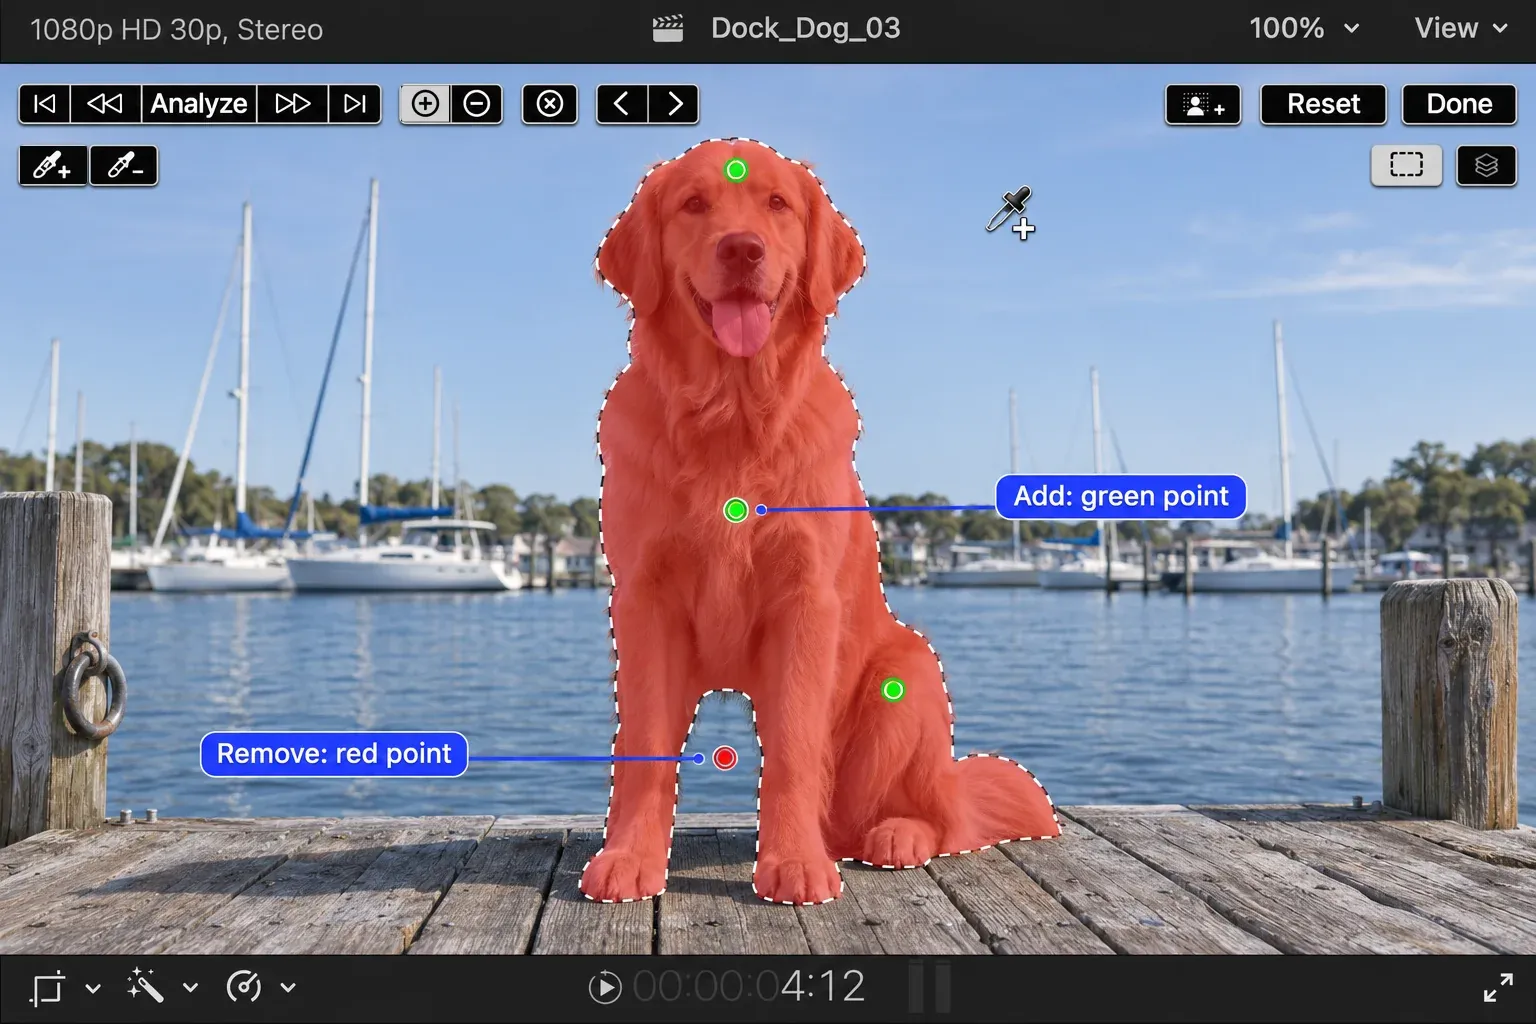
I'd start on a frame where the subject is visible and separated from the background, because a partial or occluded subject may make the initial mask less predictable. Save a difficult frame for checking the limits of the selection.
Analyze the clip
Choose the analysis action for the frames you need to cover using the controls at the top of the viewer. The five actions have different reach:
| Action | Frames covered |
|---|---|
| Previous Frame | Extends the mask to the previous frame. |
| Next Frame | Extends the mask to the next frame. |
| Analyze Backward | Applies the mask to the portion before the current frame. |
| Analyze Forward | Applies the mask to the portion after the current frame. |
| Analyze | Applies the mask to the entire clip. |
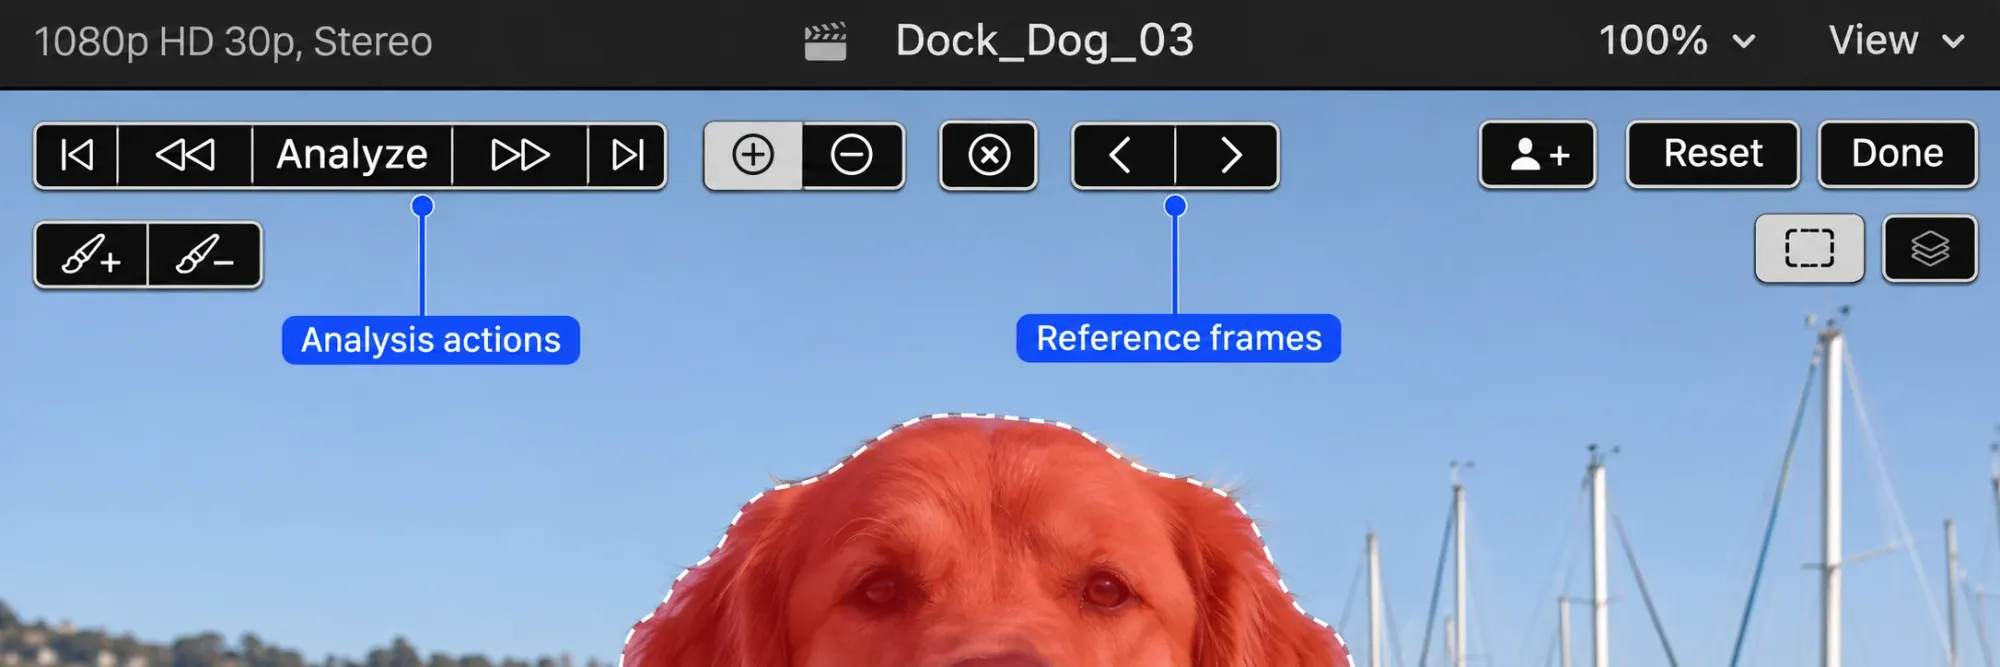
After analysis, move the playhead to the beginning of the analyzed section and play it back. Watch edges, fast motion, occlusion, and similar background colors rather than judging a single still frame.
Inspect the matte
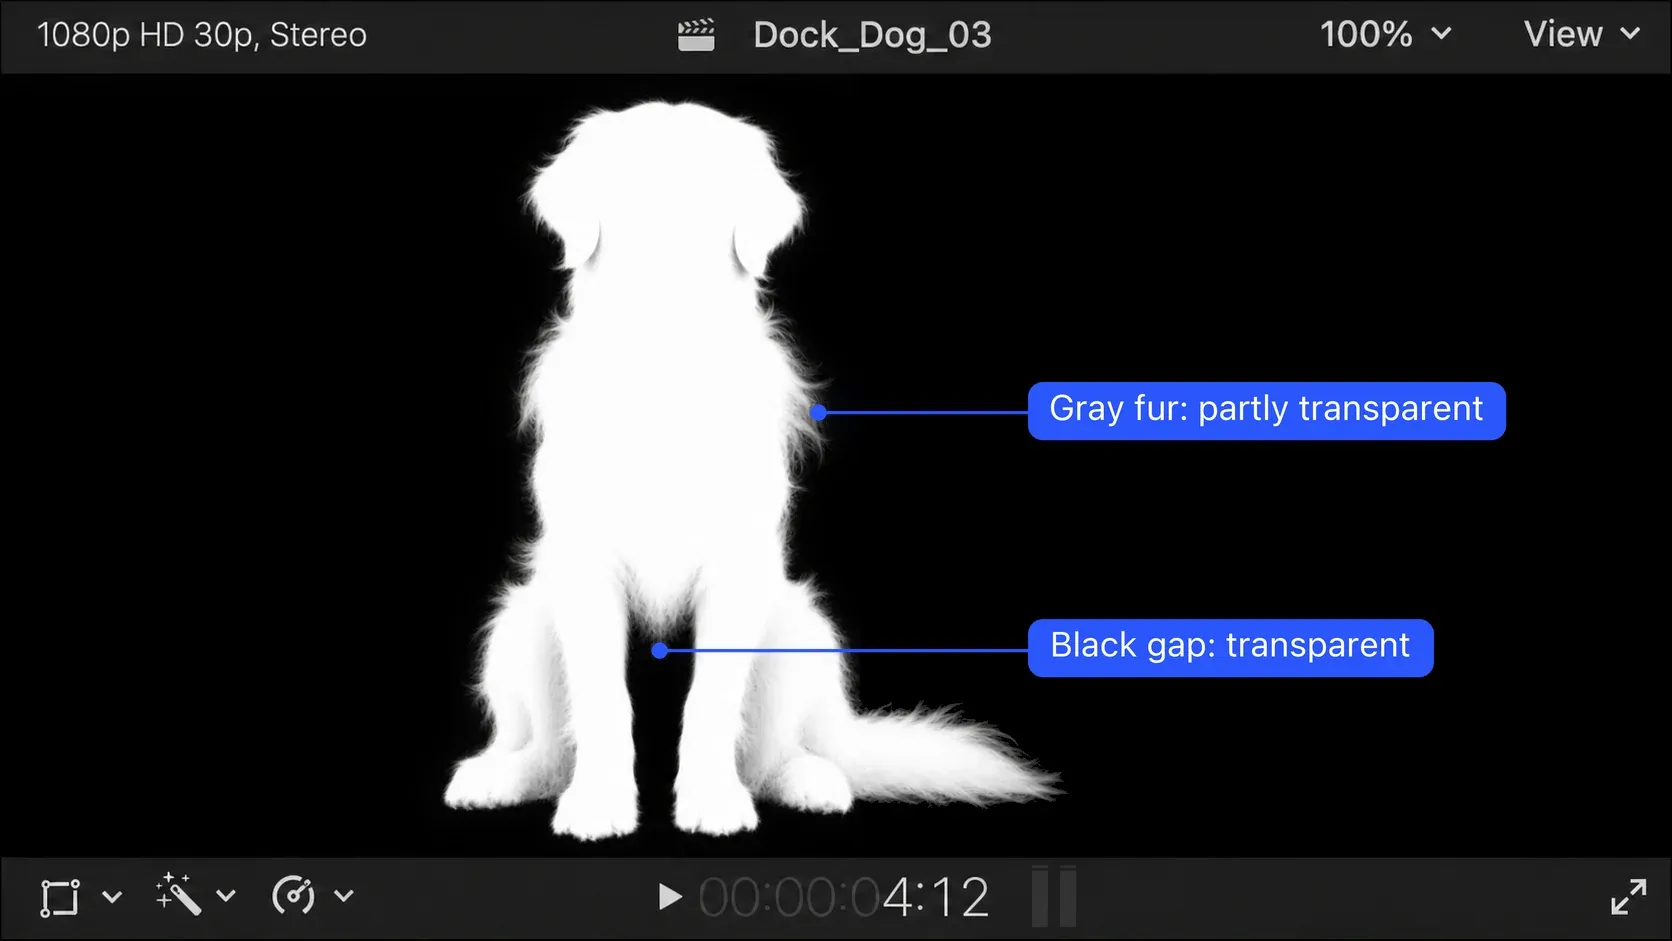
Select the masked clip and place the playhead within its masked section. If the inspector is hidden, press Command-4. Click the Video button at the top. In the Effects section, click the Magnetic Mask row you want to inspect; its controls appear above the viewer. In the Video inspector, click the down arrow next to View Masks and choose Black and White or Color. Clicking View Masks itself switches between the image and the alpha channel.
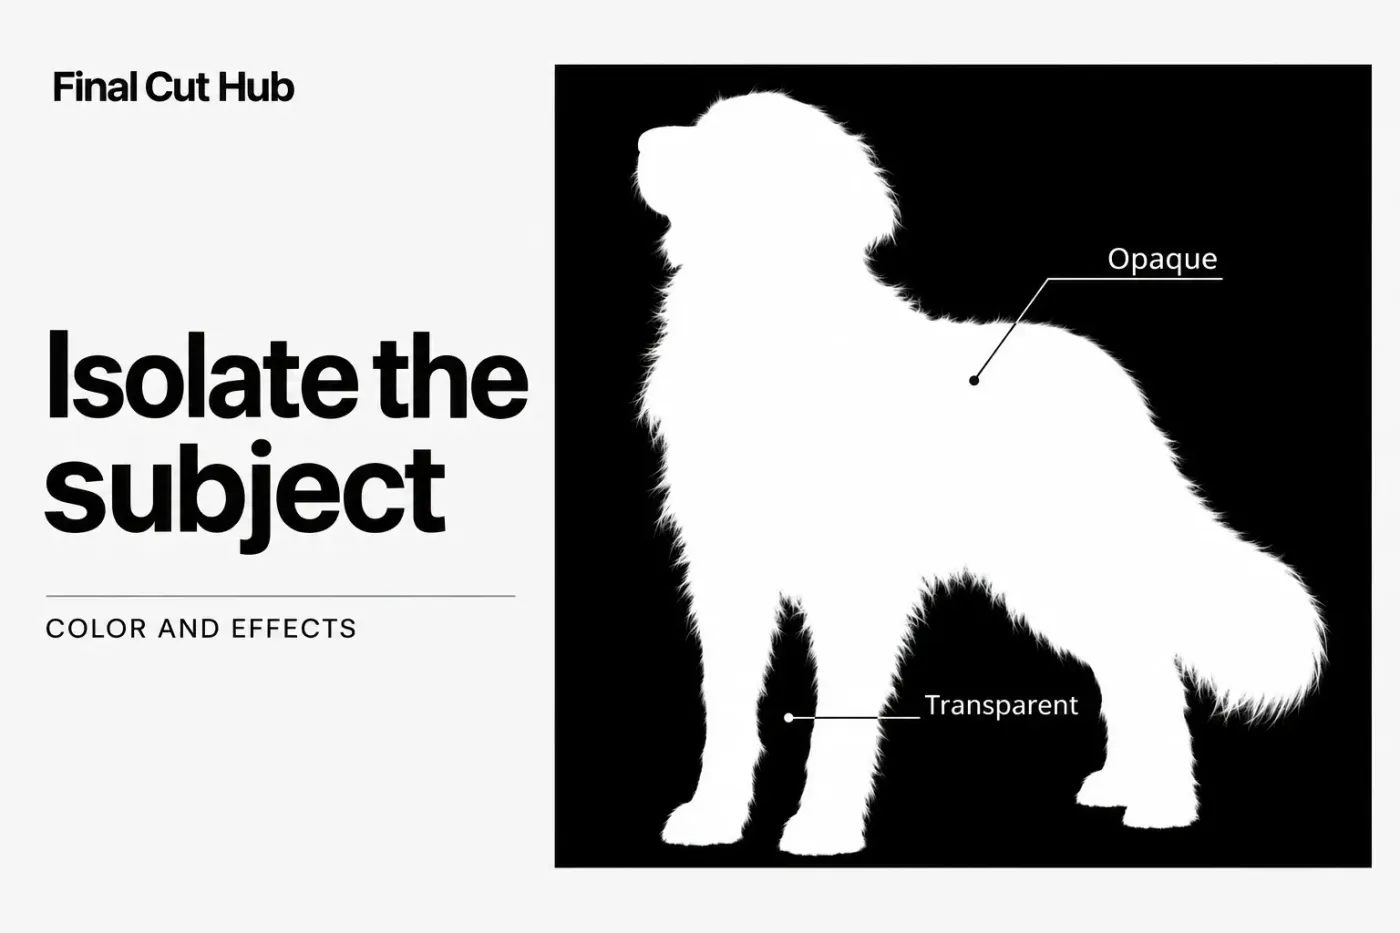
In a black-and-white alpha view, white is opaque, black is transparent, and gray is partly transparent. Check that a gap between the subject's arm and body lets the background through, while the parts of the subject you need remain opaque. I'd judge hair and soft edges against the new background rather than try to make every edge solid white, since gray there is partly transparent by design. Inspect them during playback as well as on the selected frame.
Repair the frame that fails
If part of the subject disappears or unwanted background enters the matte, stop on that frame and fix it through the control-point and brush editing route:
- Keep the clip selected and put the playhead on the frame that needs work. Open the Video inspector and click the mask's name in the Magnetic Mask section to reopen its viewer controls. Select the intended mask if the clip has more than one.
- Click Add, then click a missing subject area to include it. Click Remove, then click an unwanted area to exclude it.
- For an area better handled with a stroke, choose the Add brush or Remove brush and brush over it. Use the brush-size slider to adjust the size.
- Use the analysis action above for the frames you need to cover, then return to the beginning of that analyzed section and play it back. Recheck the failure frame and the motion around it. A corrected still frame doesn't prove that the rest of the clip is fixed.
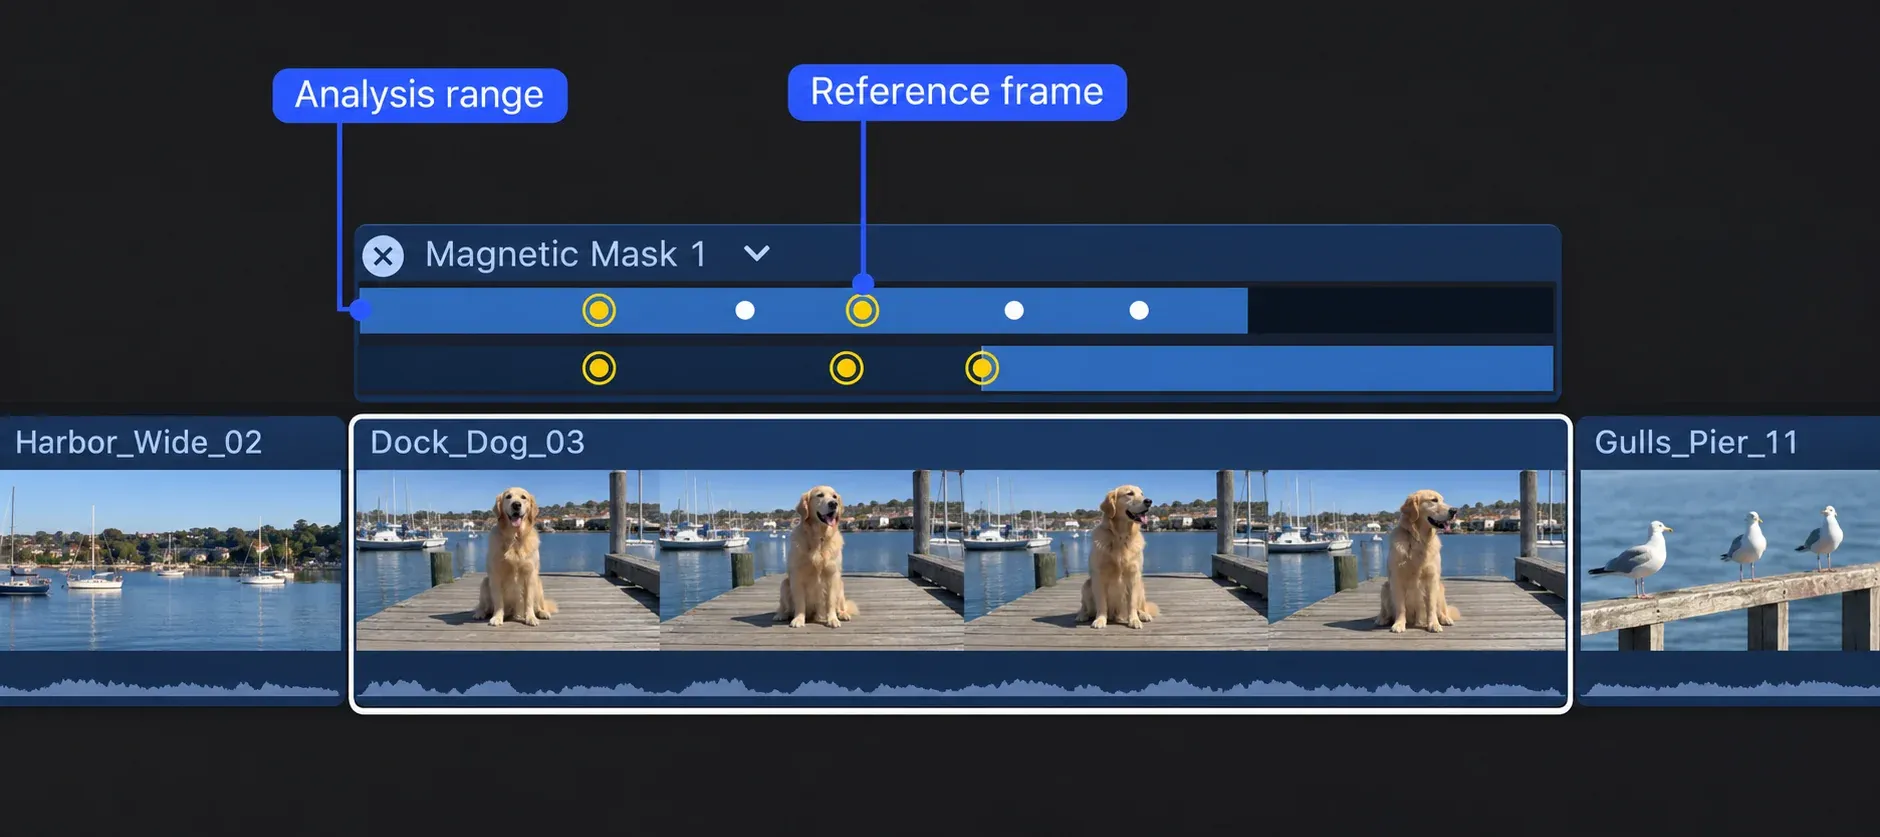
Control points and brushstrokes create reference frames. The Magnetic Mask editor in the timeline shows those frames and rendered analysis ranges above the clip. If it is hidden, select the clip and choose Clip > Show Magnetic Mask Editor. Use it to see where edits and analysis exist while you review the section you intend to use. The viewer's Reset button clears all control points and brushstrokes for the current frame, so use it only when you intend to rebuild that frame's selection.
After making the needed adjustments and reviewing the used section, click Done in the upper-right corner of the viewer. The standalone effect removes the background and leaves transparency. With the isolated foreground in the primary storyline, drag the new background clip below it so it connects beneath it.
Plan around Magnetic Mask limitations
High-resolution media can create significant analysis files. For performance, Apple recommends a Mac with Apple silicon; how long an export takes still depends on the media and the Mac.
To run the unused Magnetic Mask file cleanup, select the library containing the masked projects in the Libraries sidebar. Choose File > Delete Generated Library Files. In the window, select Delete Unused Magnetic Mask Files and click OK. Then close and reopen that library, or quit and reopen Final Cut Pro.
After isolating the subject, check its exposure and color against the surrounding shot with the color-correction workflow.